Add and arrange effects
- Tap MODELS in the top bar and open the EFFECTS tab. + BLOCK in the chain header opens it too.
- Search, or narrow the list with ALL · ELEC · ACOUSTIC · VOCAL.
- Drag an effect into the chain, or tap it while no block is selected to add it.
- Tapping an effect while an effect block is selected replaces that block. Note Its position and on/off state stay; values start from the new effect’s defaults.
- Drag blocks in the chain to change their order.
Find it on screen
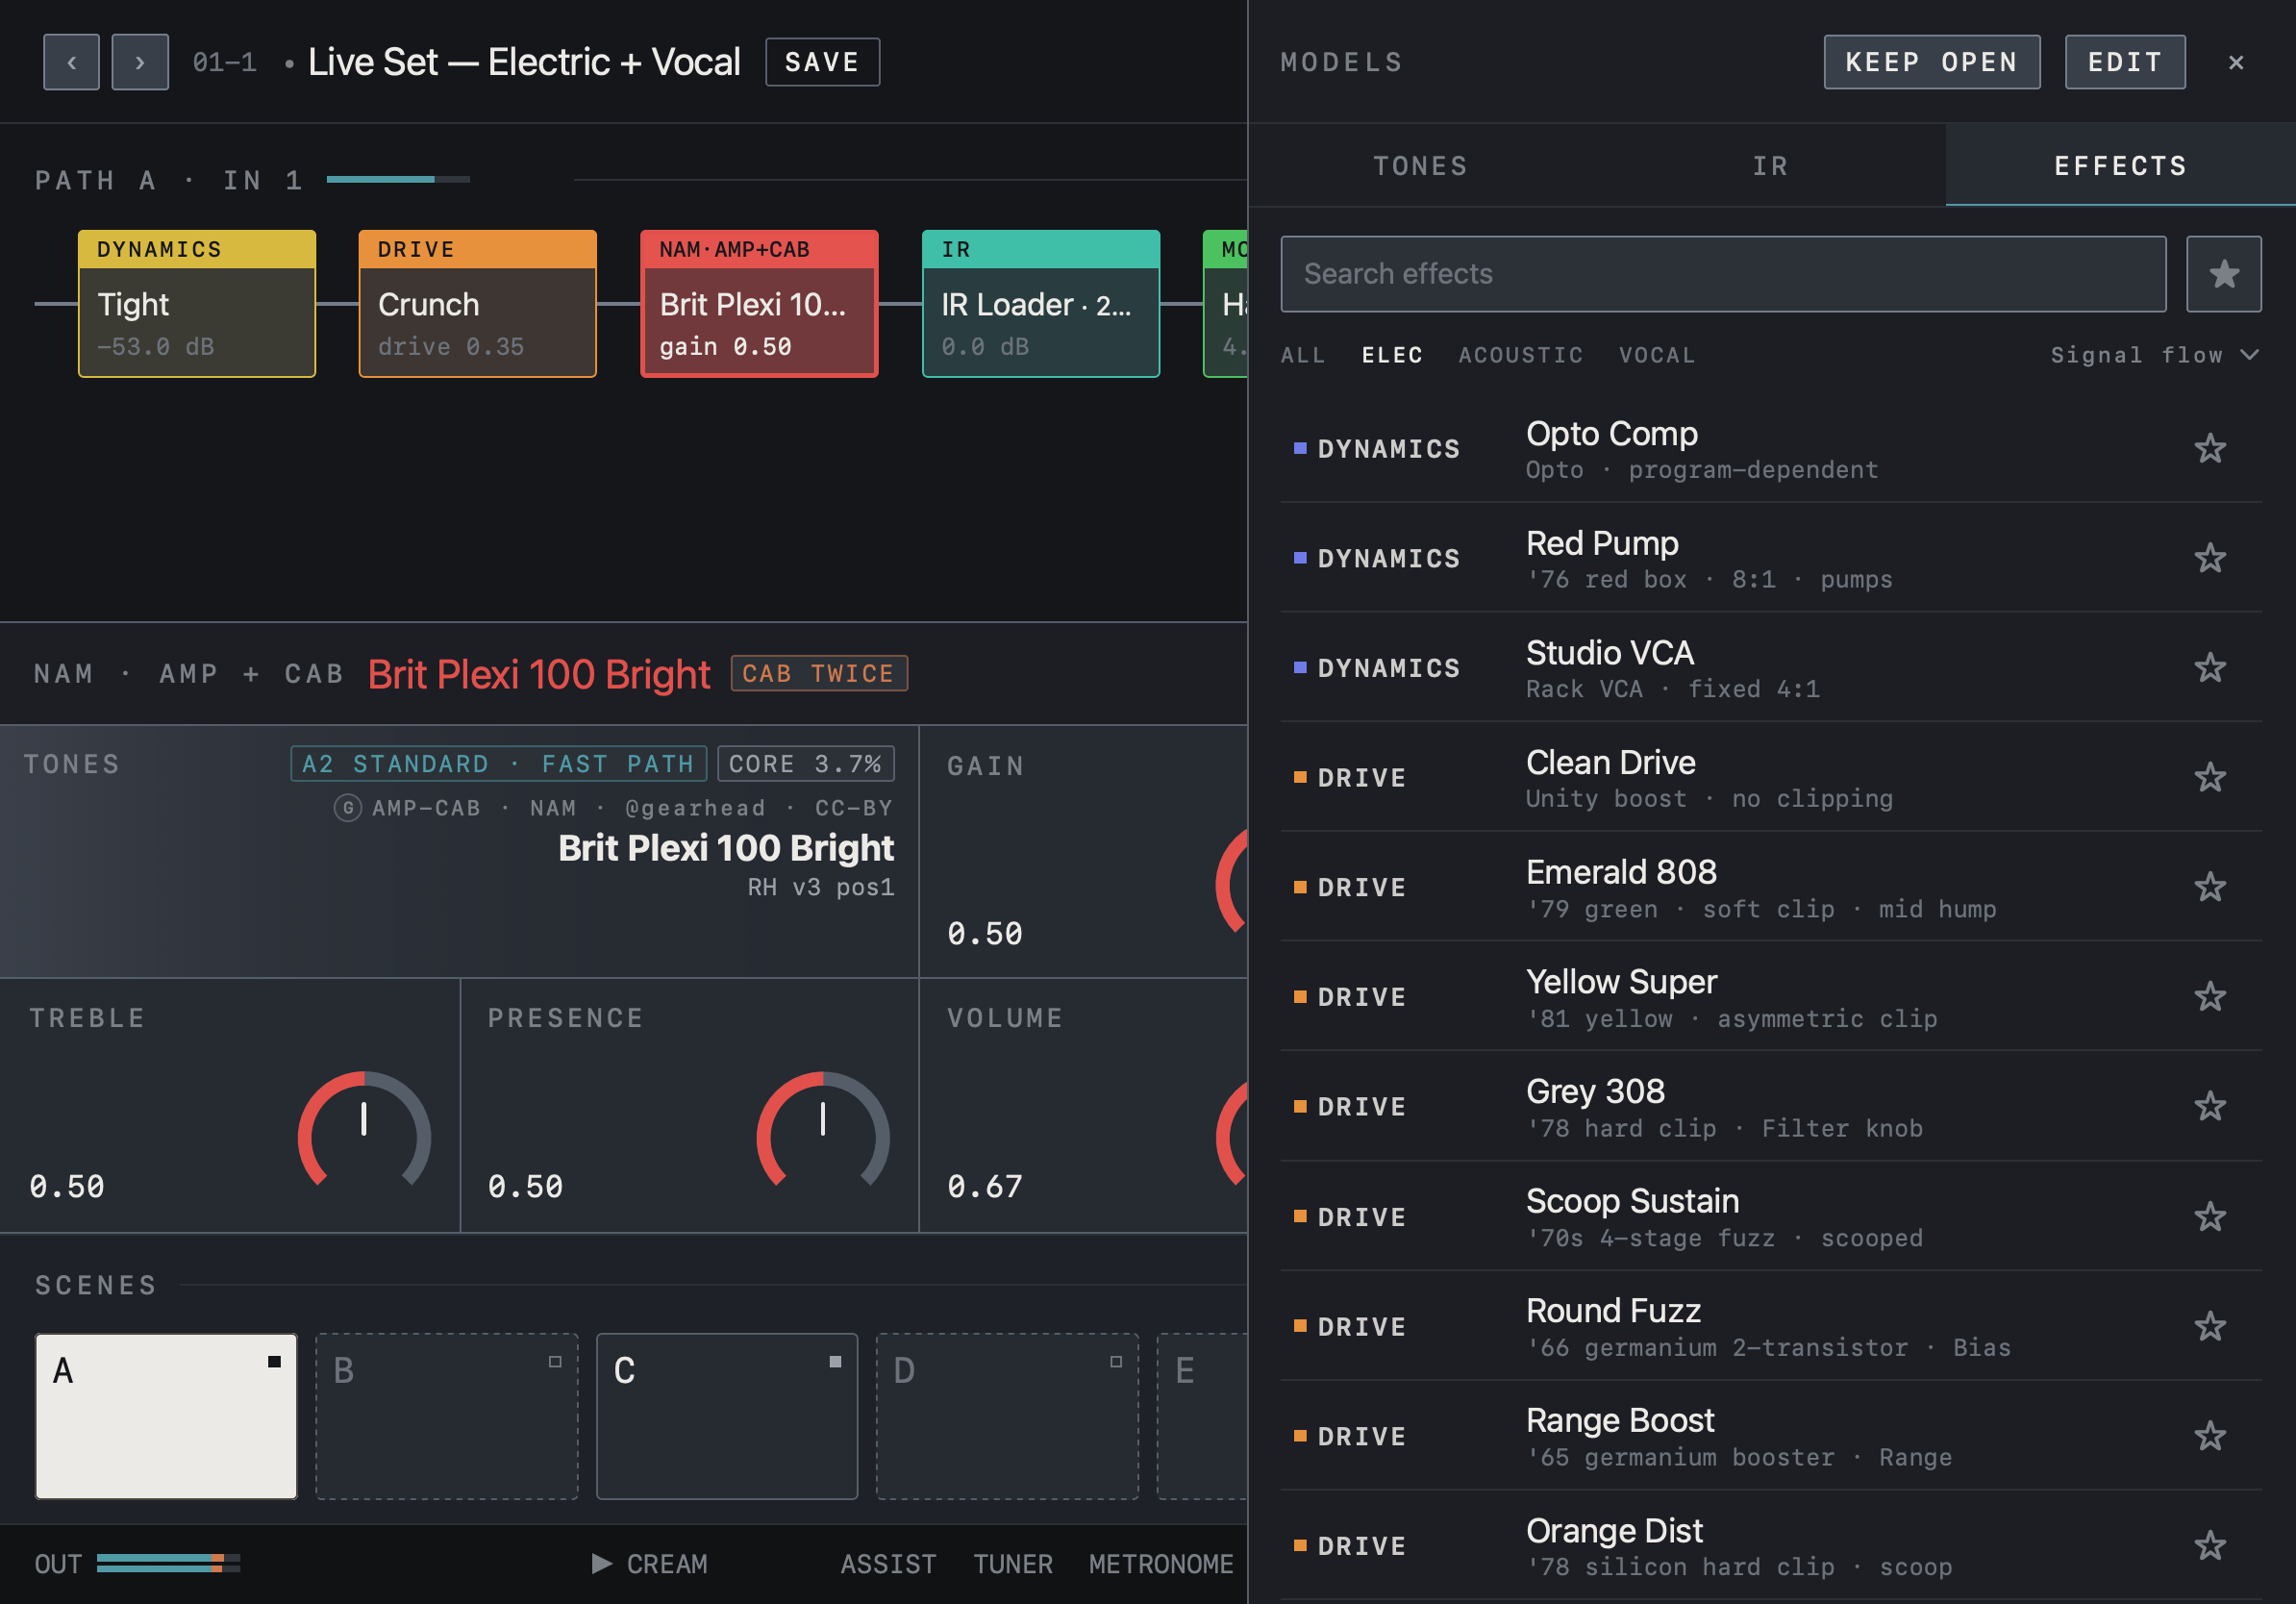
- This is the EFFECTS tab of MODELS. Narrow the list with the search field and ALL · ELEC · ACOUSTIC · VOCAL.
- Each row shows the category (DYNAMICS, DRIVE …), the effect name and a short description. ☆ marks a favorite.
- Drag an effect into the chain on the left. KEEP OPEN leaves the list open.
Find it on screen
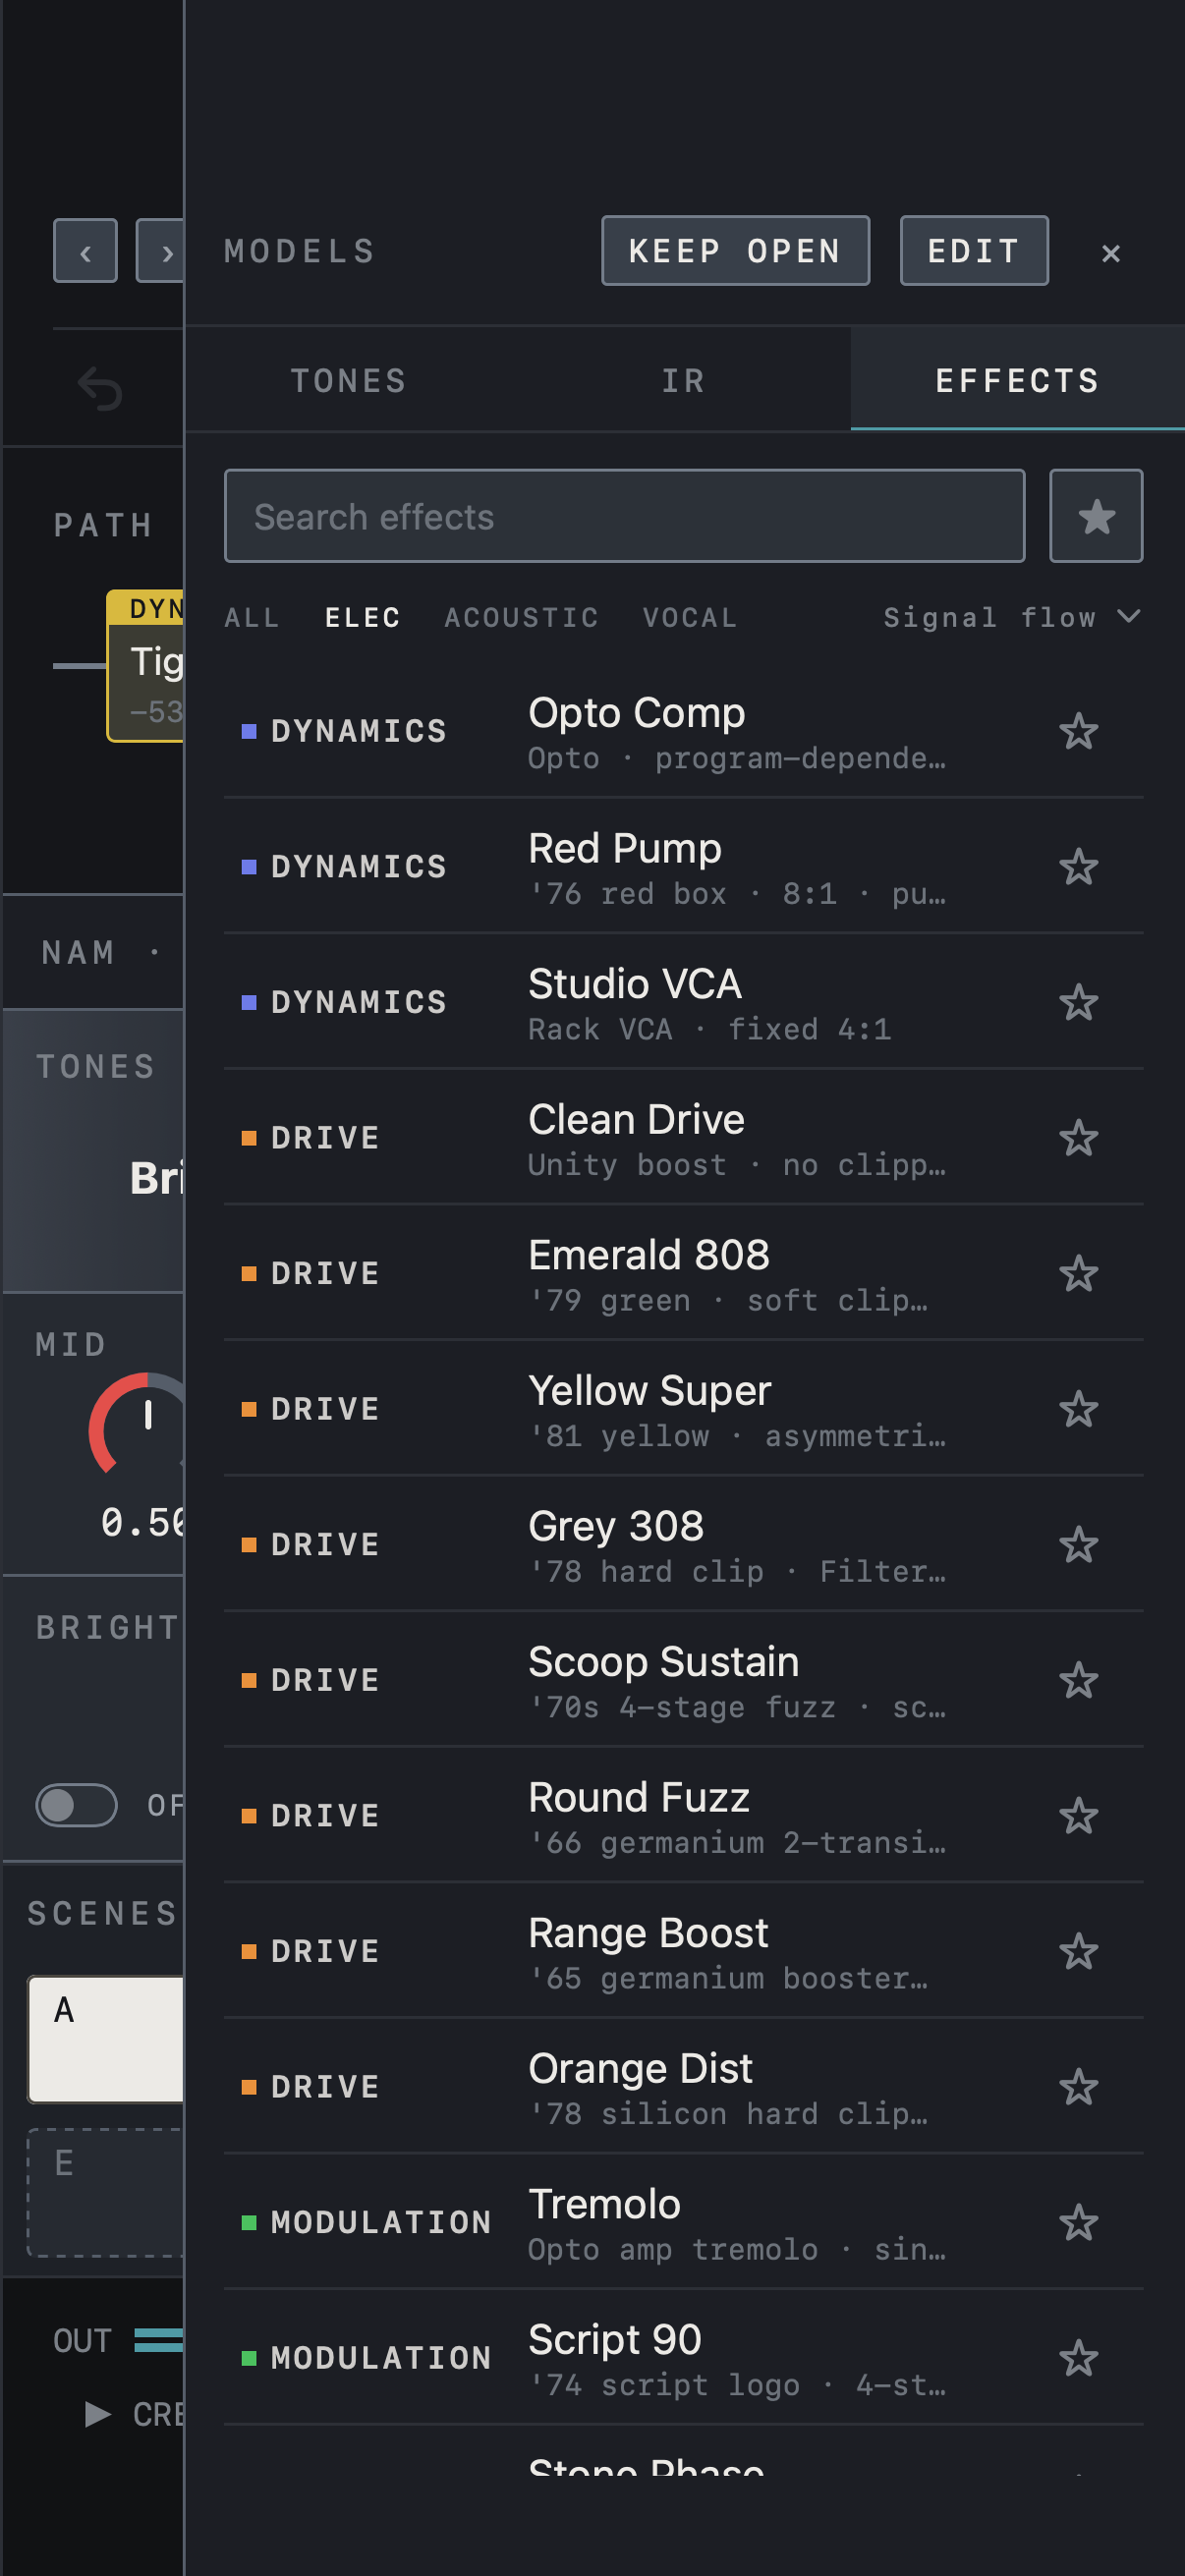
- This is the EFFECTS tab of MODELS. On iPhone the list covers most of the screen.
- Narrow the list with the search field and ALL · ELEC · ACOUSTIC · VOCAL. ☆ marks a favorite.
- With no block selected, tap an effect to add it to the chain. KEEP OPEN leaves the list open.
Find it on screen
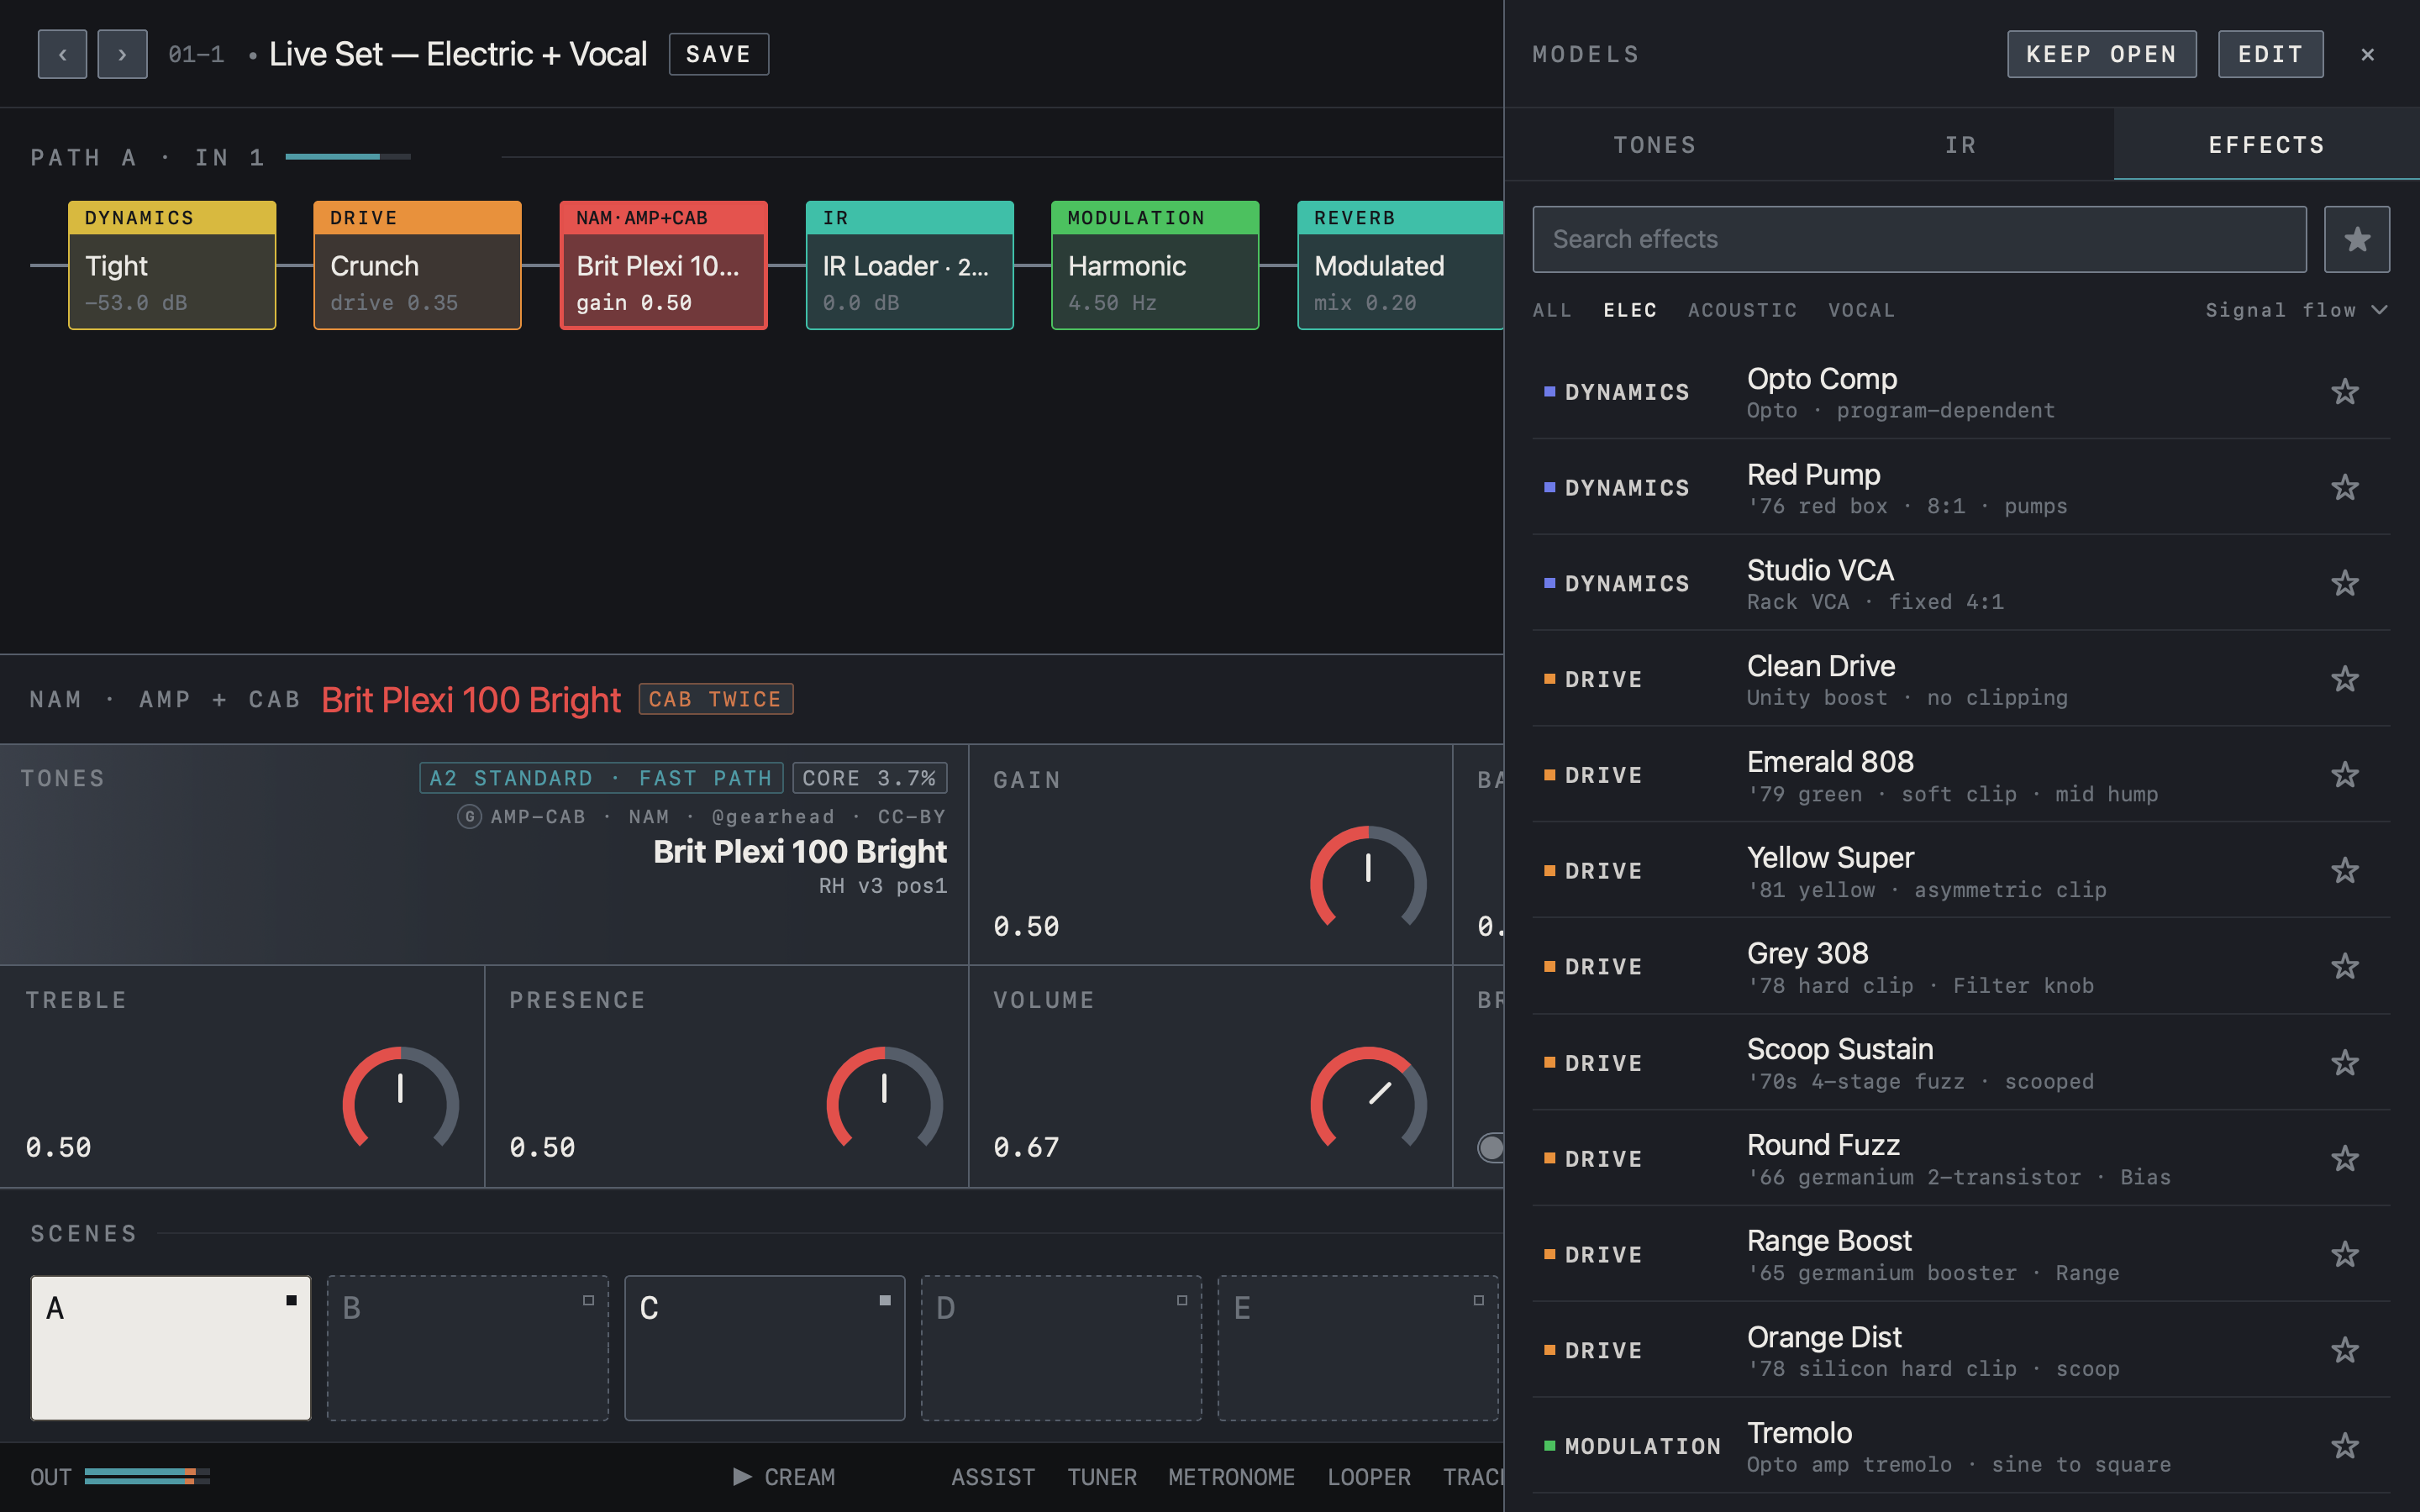
- This is the EFFECTS tab of MODELS. Narrow the list with the search field and ALL · ELEC · ACOUSTIC · VOCAL.
- Each row shows the category (DYNAMICS, DRIVE …), the effect name and a short description. ☆ marks a favorite.
- Drag an effect into the chain on the left. KEEP OPEN leaves the list open.
Parallel branches and merge
SPLIT duplicates the signal into two parallel lanes. Place blocks on each lane as needed. The lanes sum at the merge point. Select the split and use BALANCE to set the relative lane levels. A PAN and B PAN position each lane in the stereo field. The aligned indicator shows that lane latency has been compensated. Use ✕ above the selected split to remove it.
Caution If frequencies cancel when the lanes are summed, check the sound in mono as well.
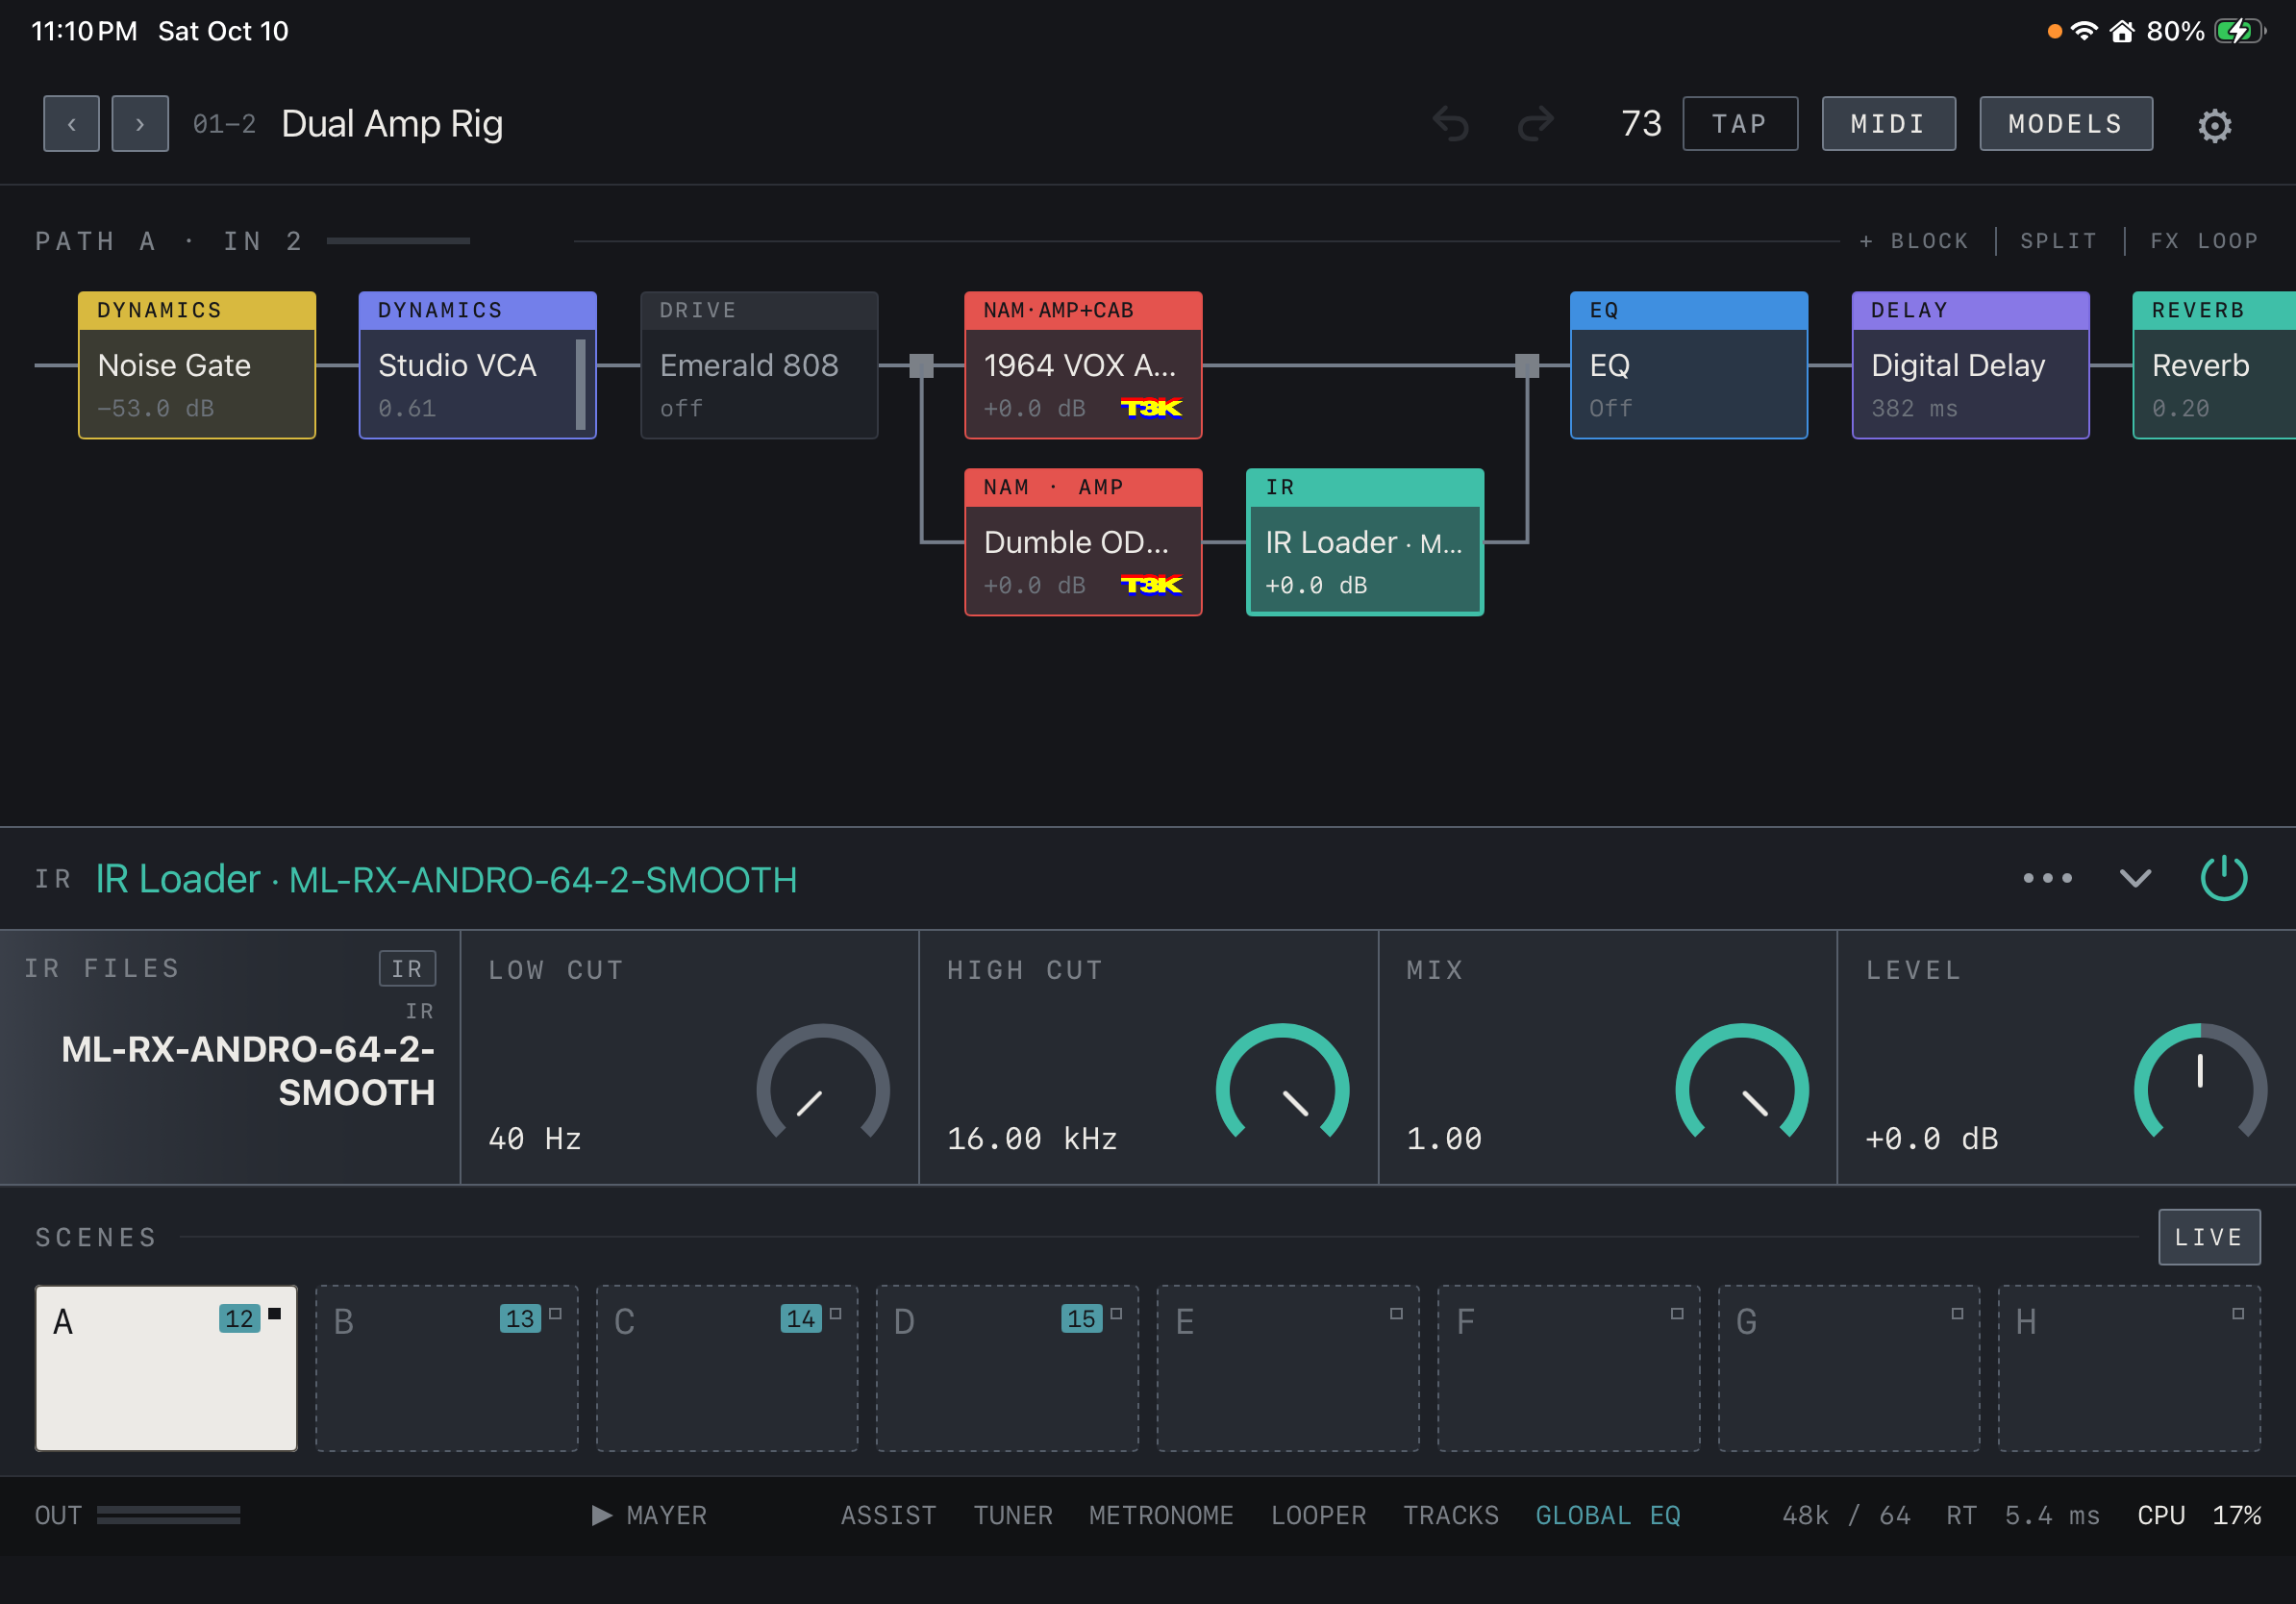
Find it on screen
- The square after DRIVE is the split point. The upper lane holds an amp + cab capture; the lower lane holds an amp capture and an IR Loader.
- The lanes merge again at the square on the right and continue to the EQ.
- The panel below shows the controls of the selected IR Loader block.
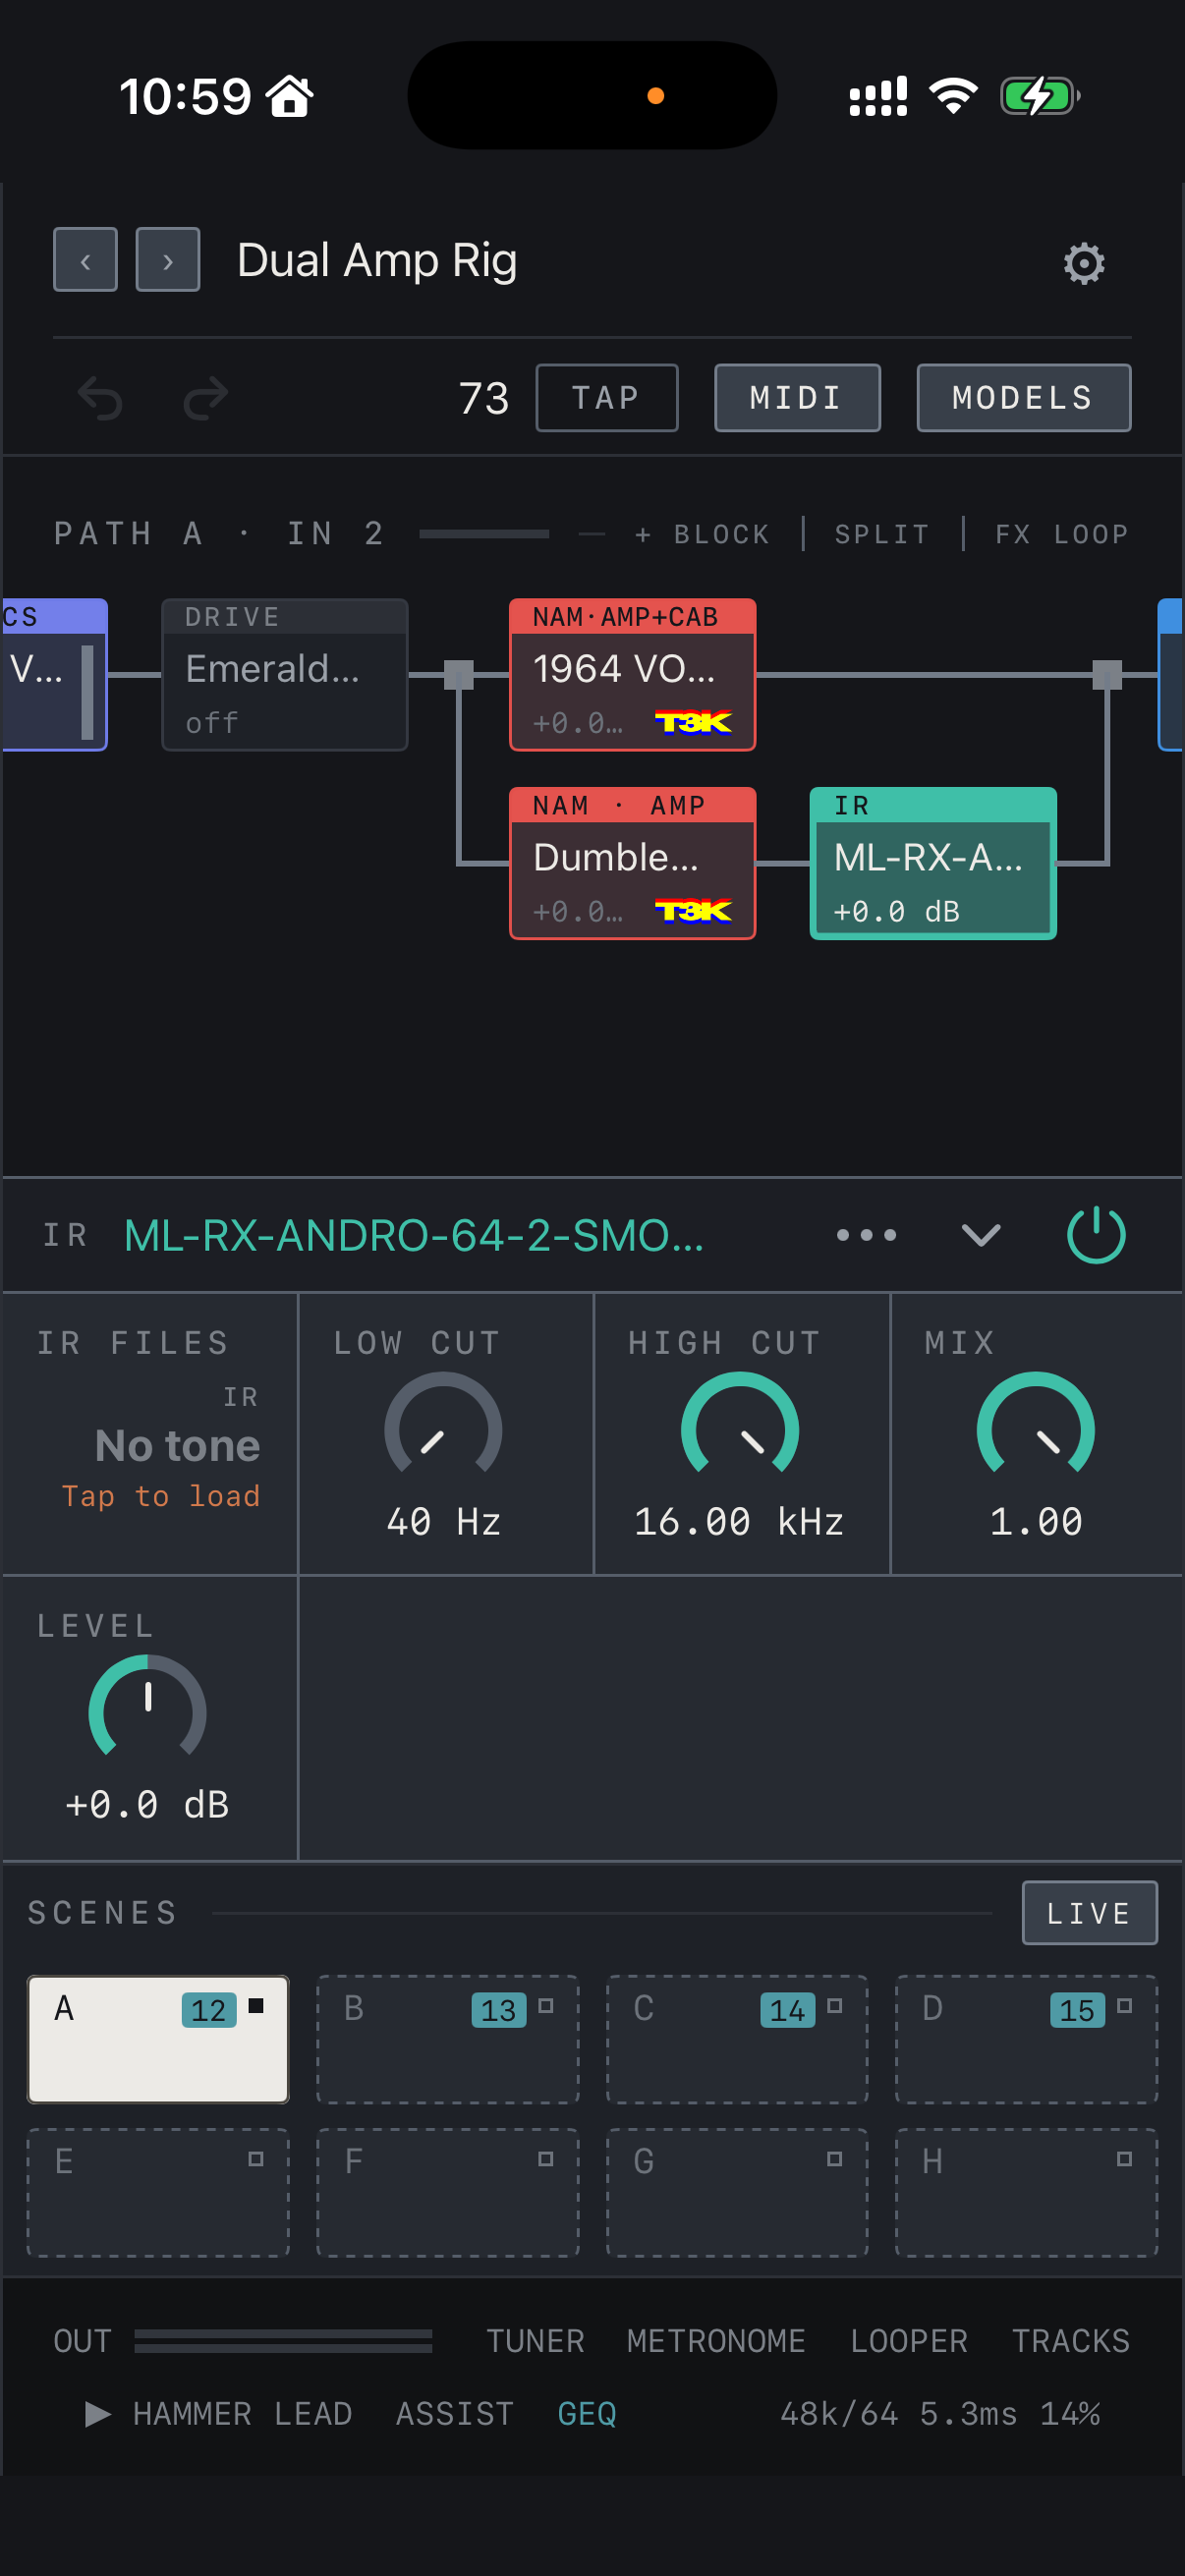
Find it on screen
- The square after DRIVE is the split point. The upper lane holds an amp + cab capture; the lower lane holds an amp capture and an IR Loader.
- The lanes merge again at the square on the right and continue to the EQ.
- The panel below shows the controls of the selected IR Loader block.
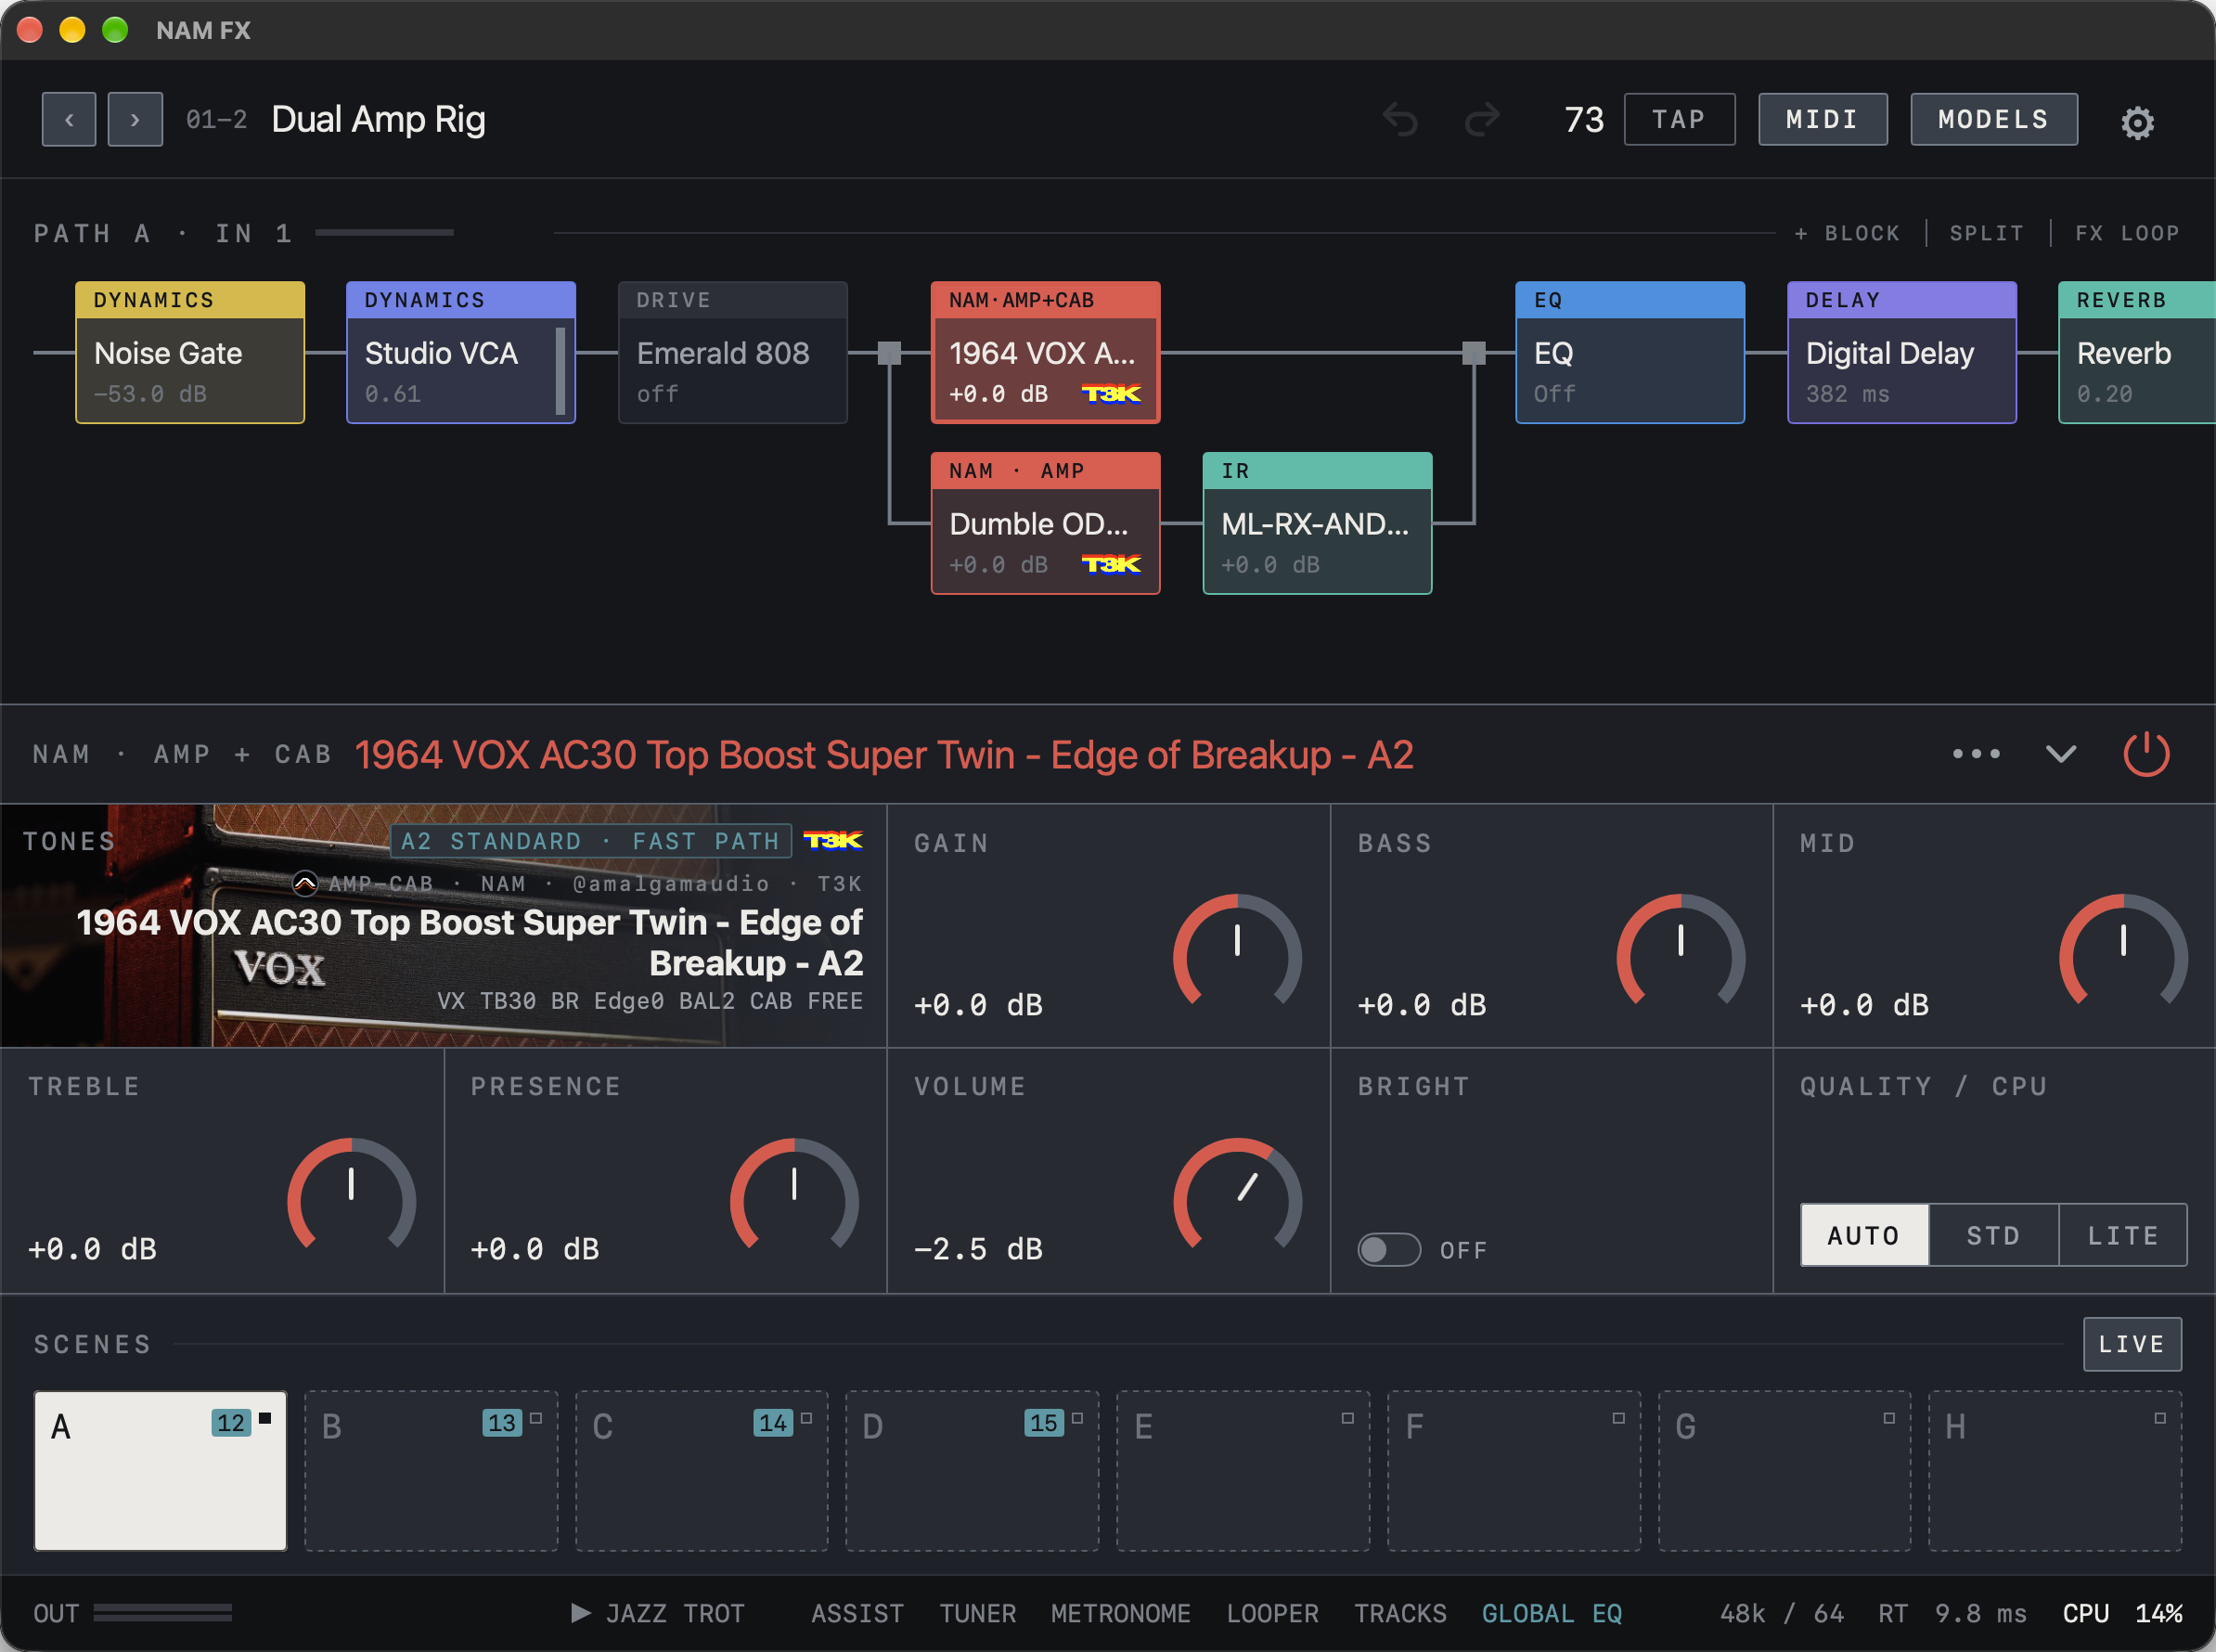
Find it on screen
- The square after DRIVE is the split point. The upper lane holds an amp + cab capture; the lower lane holds an amp capture and an IR Loader.
- The lanes merge again at the square on the right and continue to the EQ.
- The panel below shows the controls of the selected NAM block on the upper lane.
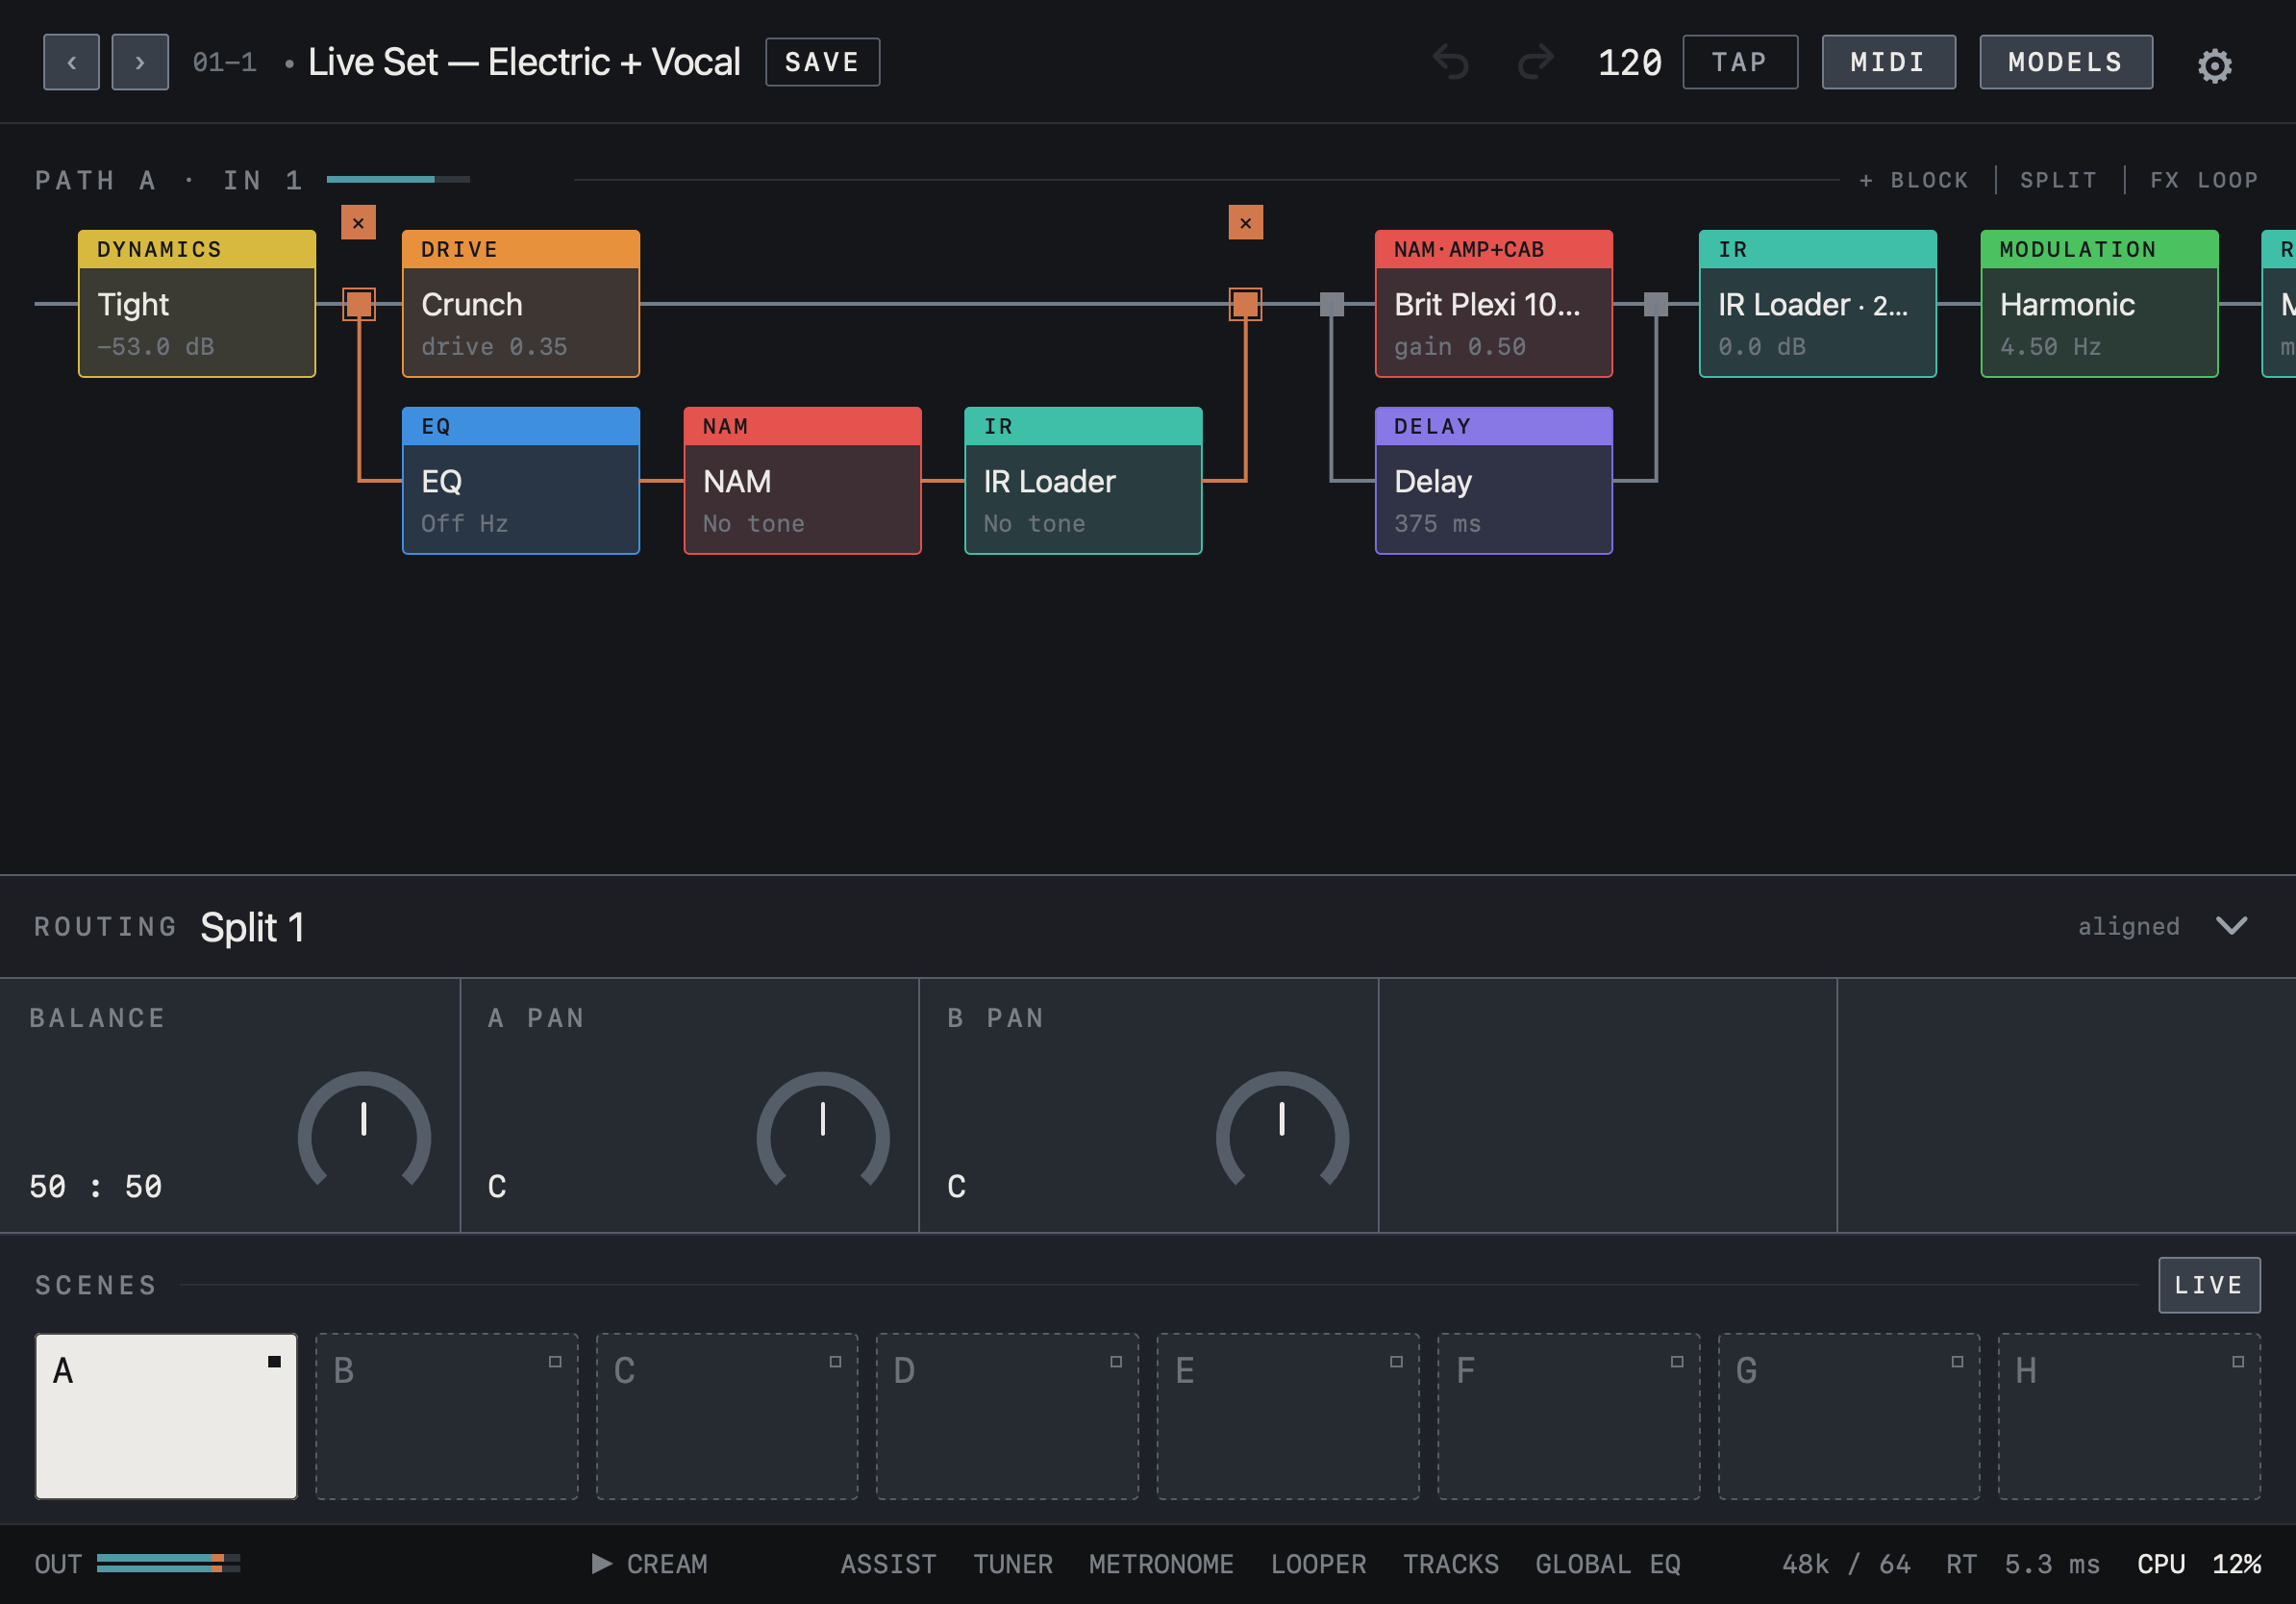
Find it on screen
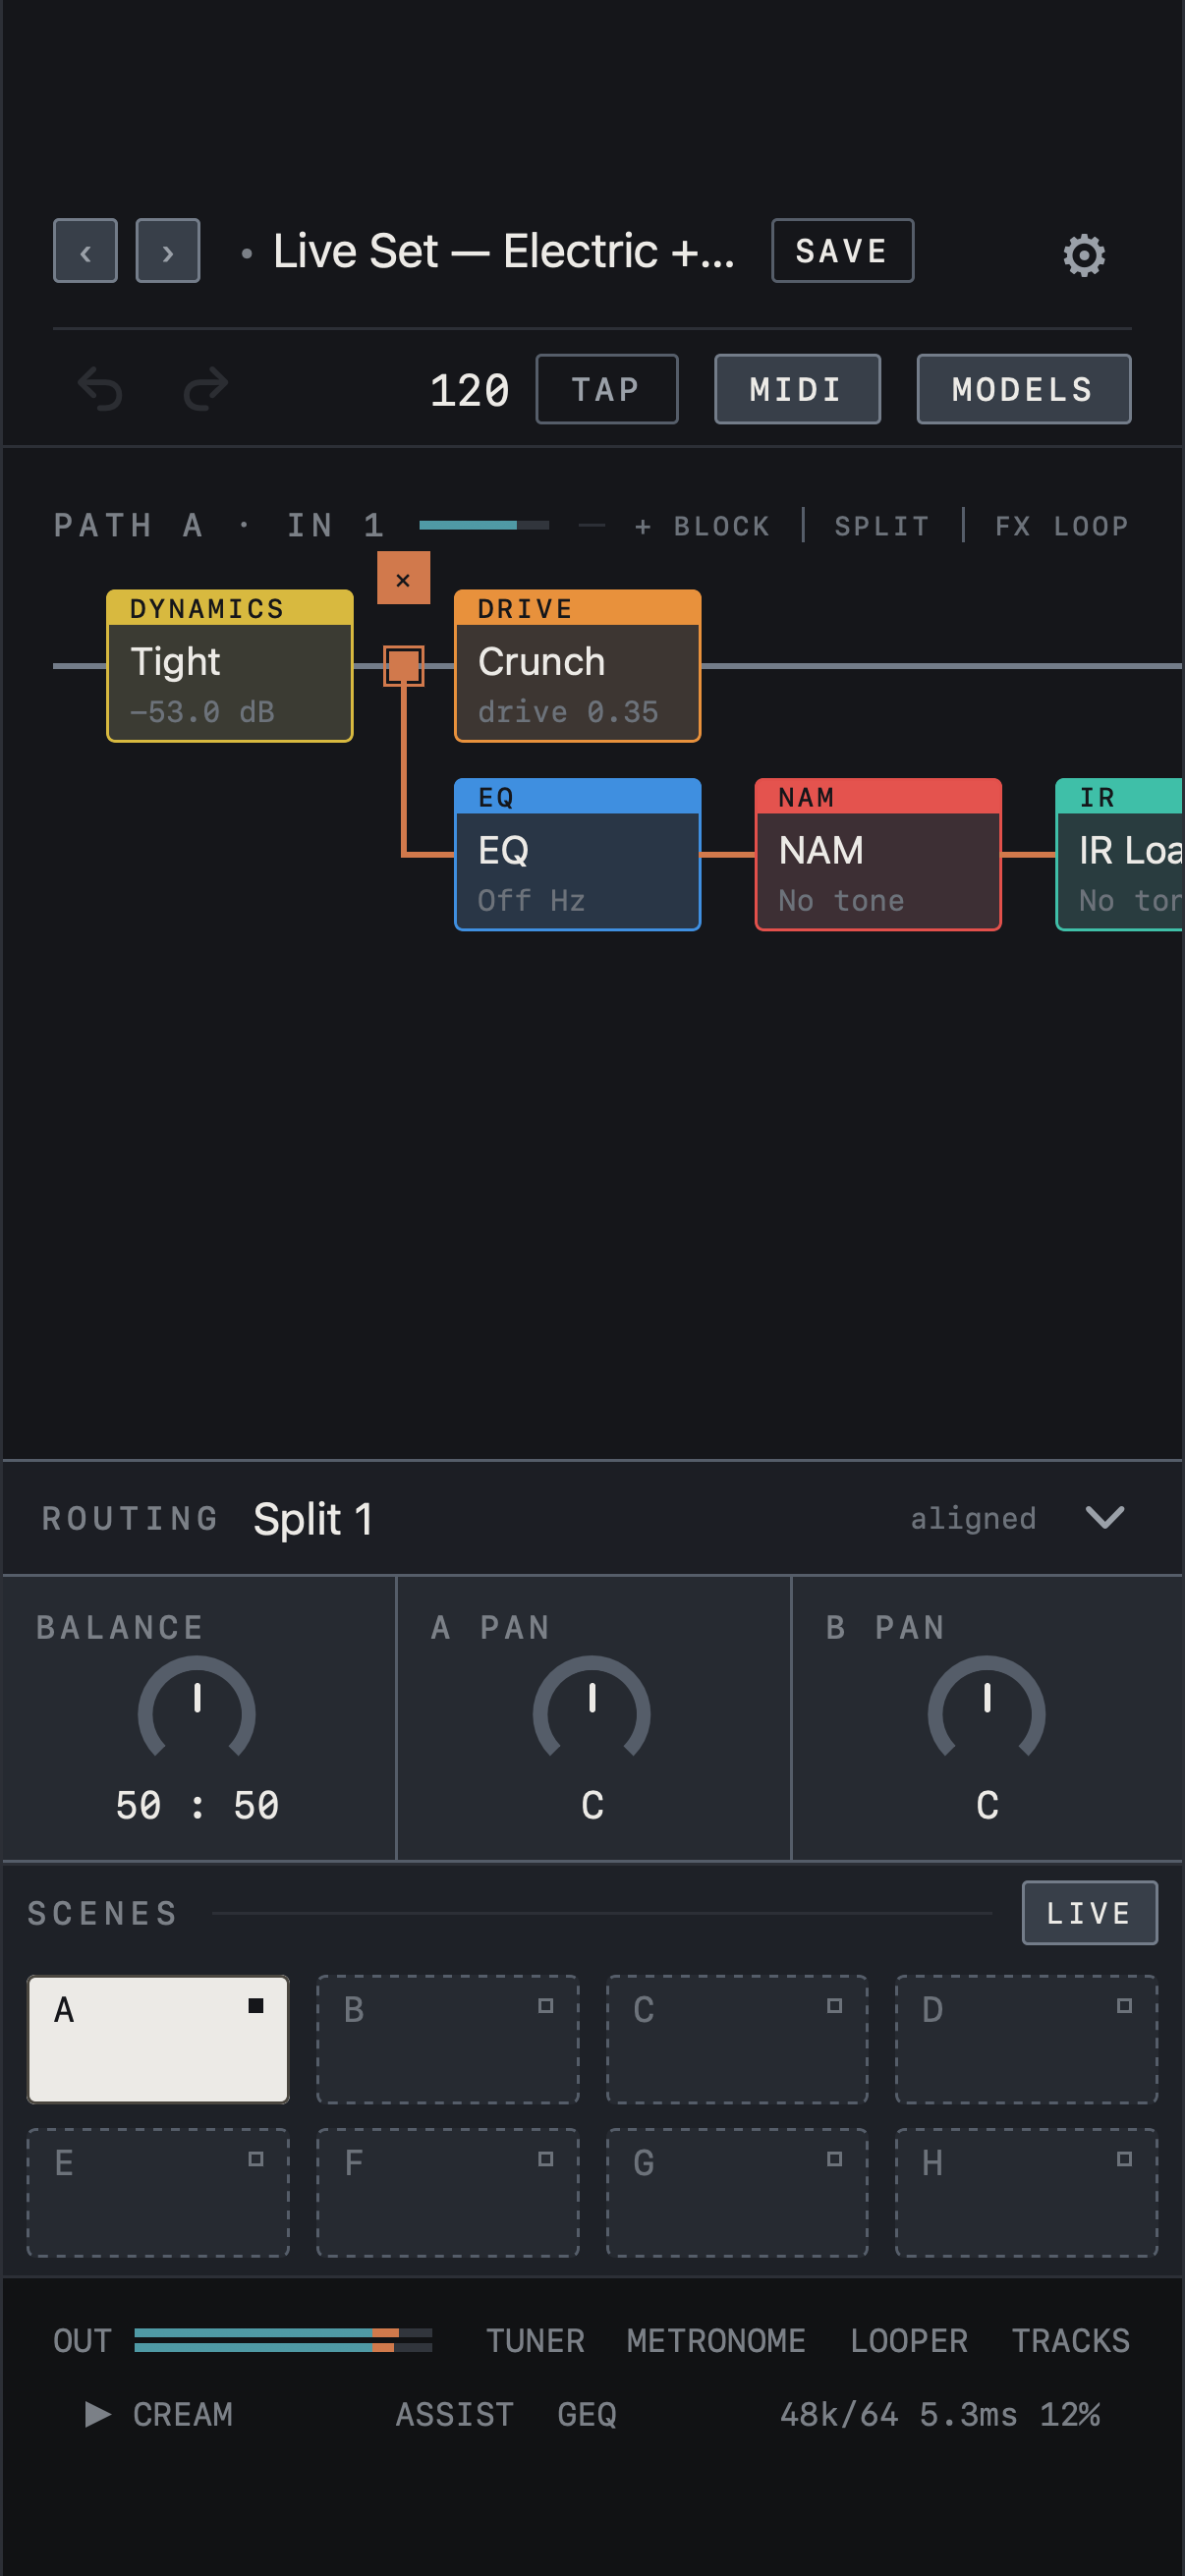
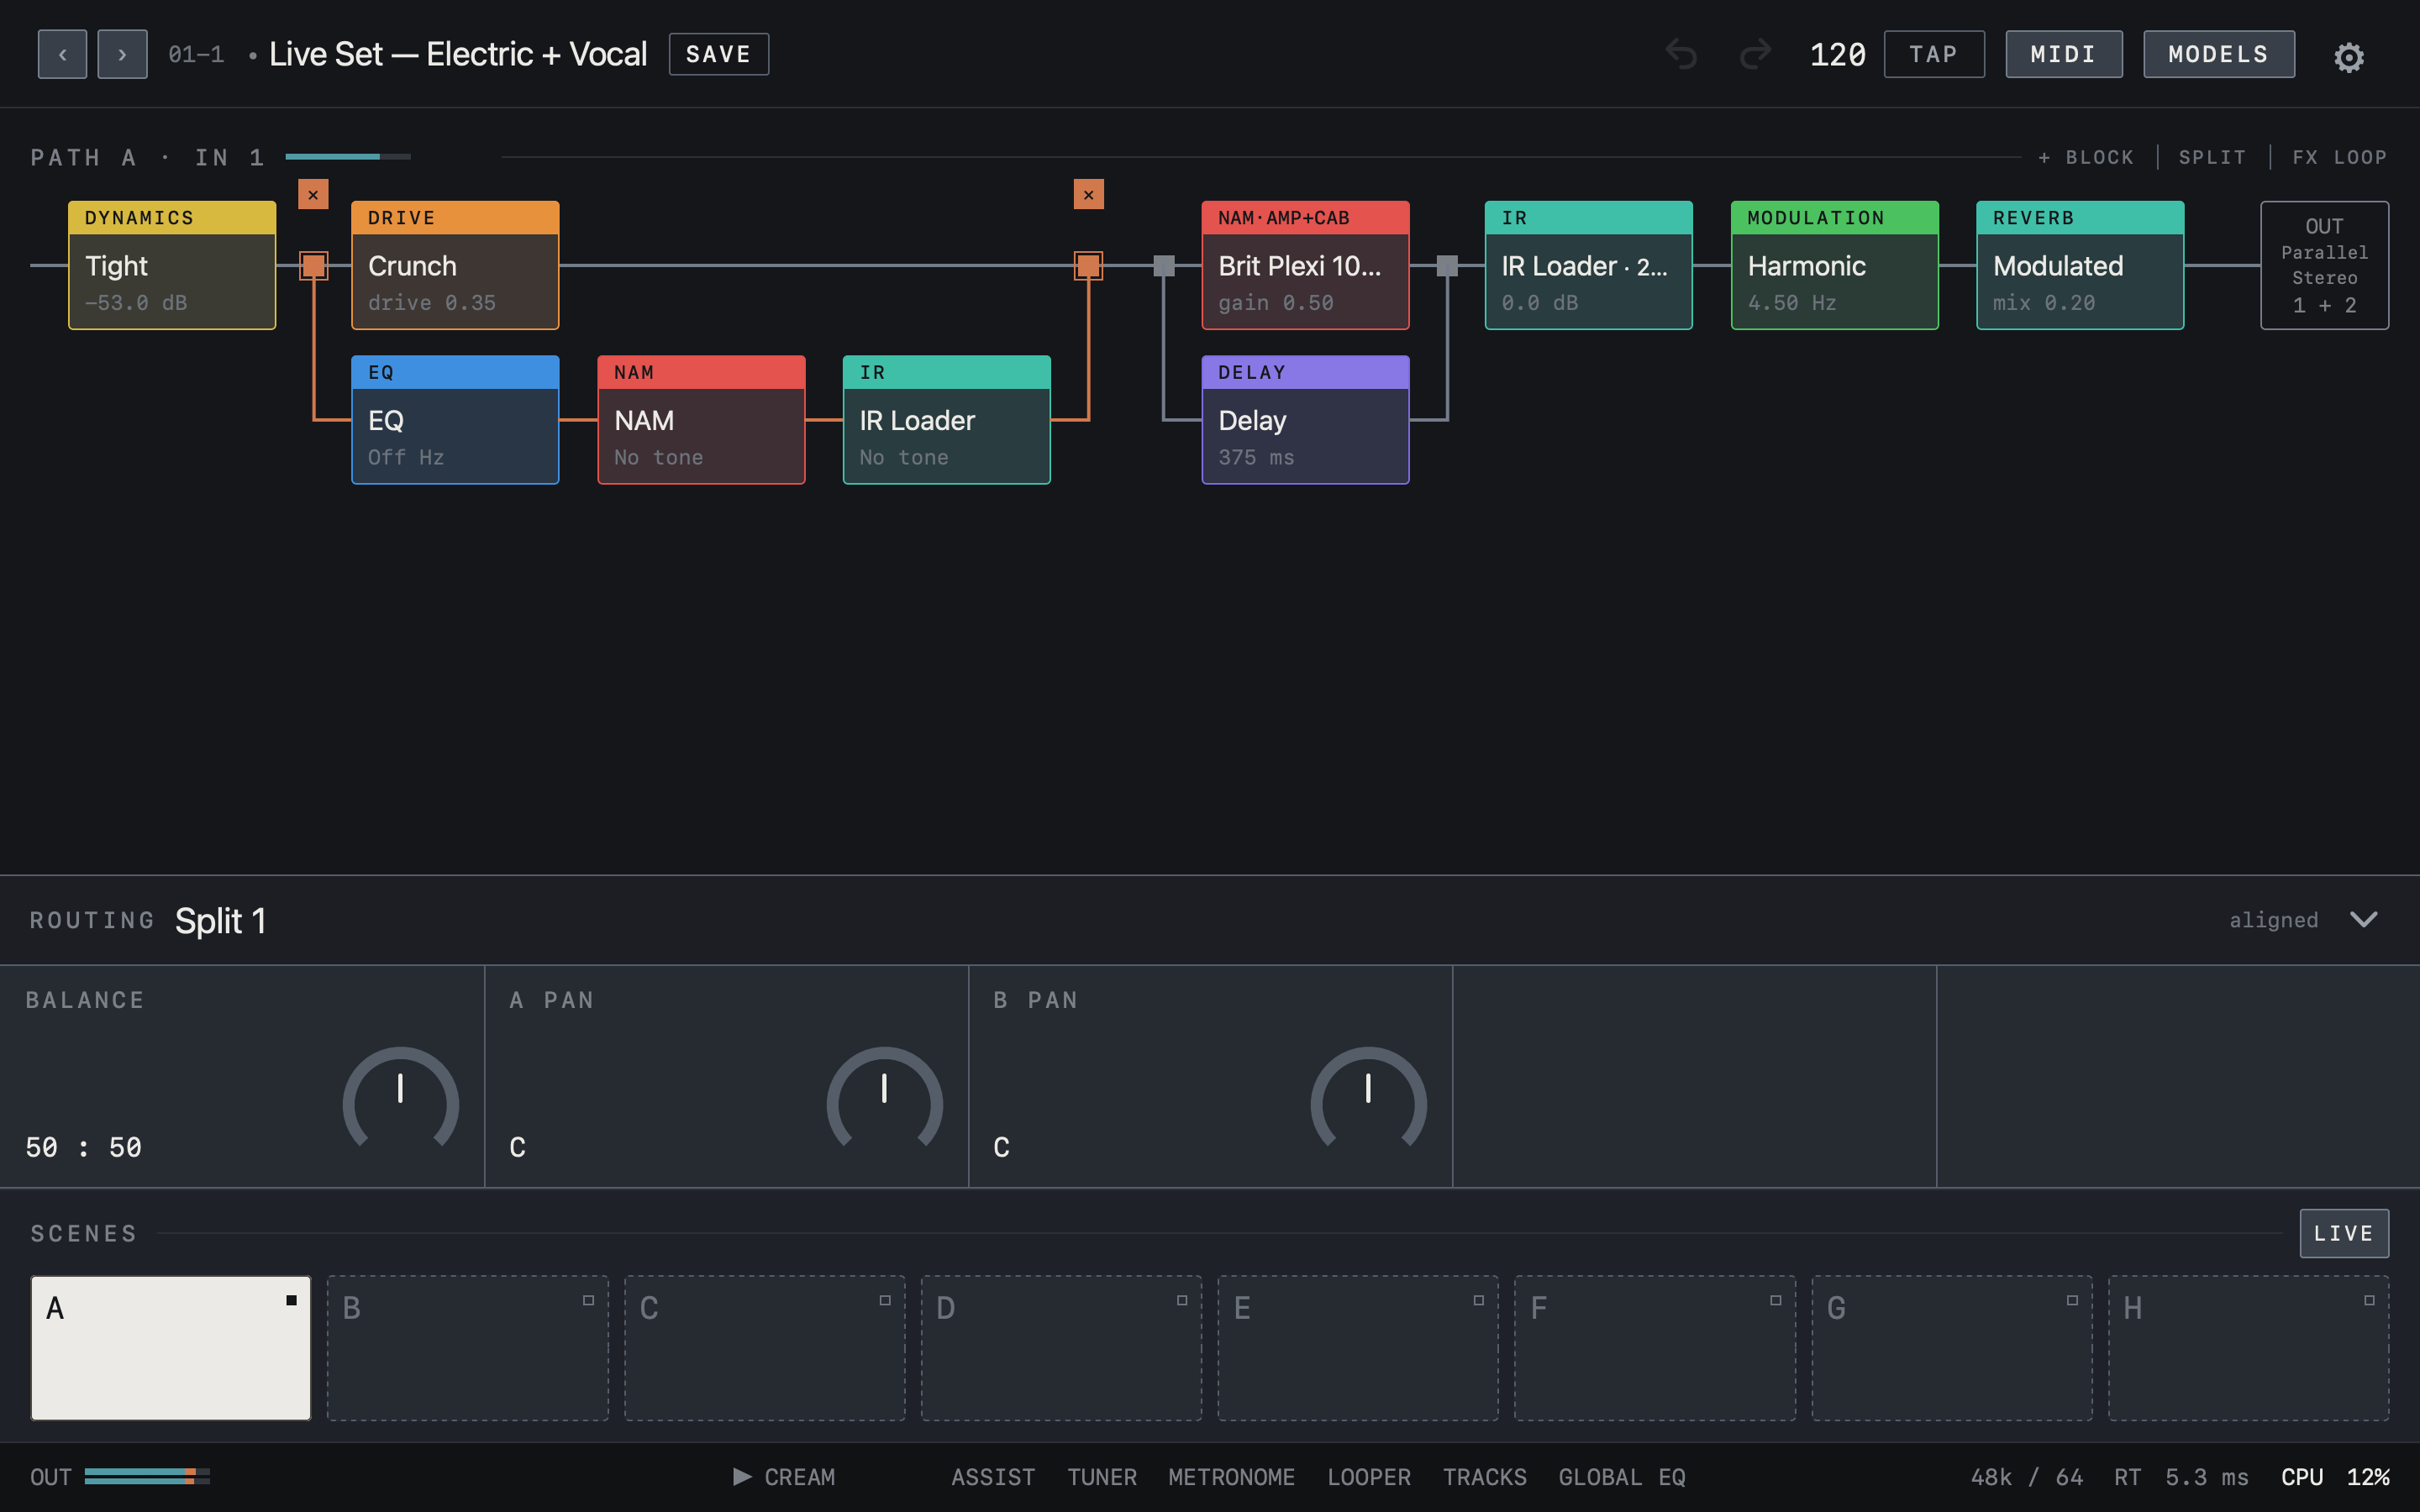
- The orange lines and split points mark the selected parallel split. The ✕ above removes it.
- Use BALANCE, A PAN and B PAN in the ROUTING panel to adjust the blend and stereo placement.
- aligned at the right of the panel means the two lanes’ delays are matched.
Find it on screen
- The orange lines and split points mark the selected parallel split. The ✕ above removes it.
- Use BALANCE, A PAN and B PAN in the ROUTING panel to adjust the blend and stereo placement.
- aligned at the right of the panel means the two lanes’ delays are matched.
Find it on screen
- The orange lines and split points mark the selected parallel split. The ✕ above removes it.
- Use BALANCE, A PAN and B PAN in the ROUTING panel to adjust the blend and stereo placement.
- aligned at the right of the panel means the two lanes’ delays are matched.
Use PATH B
PATH B is a second signal path in the same preset. Use it to process a separate input, such as a vocal alongside a guitar, with its own chain. In Settings, turn on PATH B under Input channels and select the physical IN you’re using. PATH B appears below PATH A. Saving the preset stores both chains.
Find it on screen
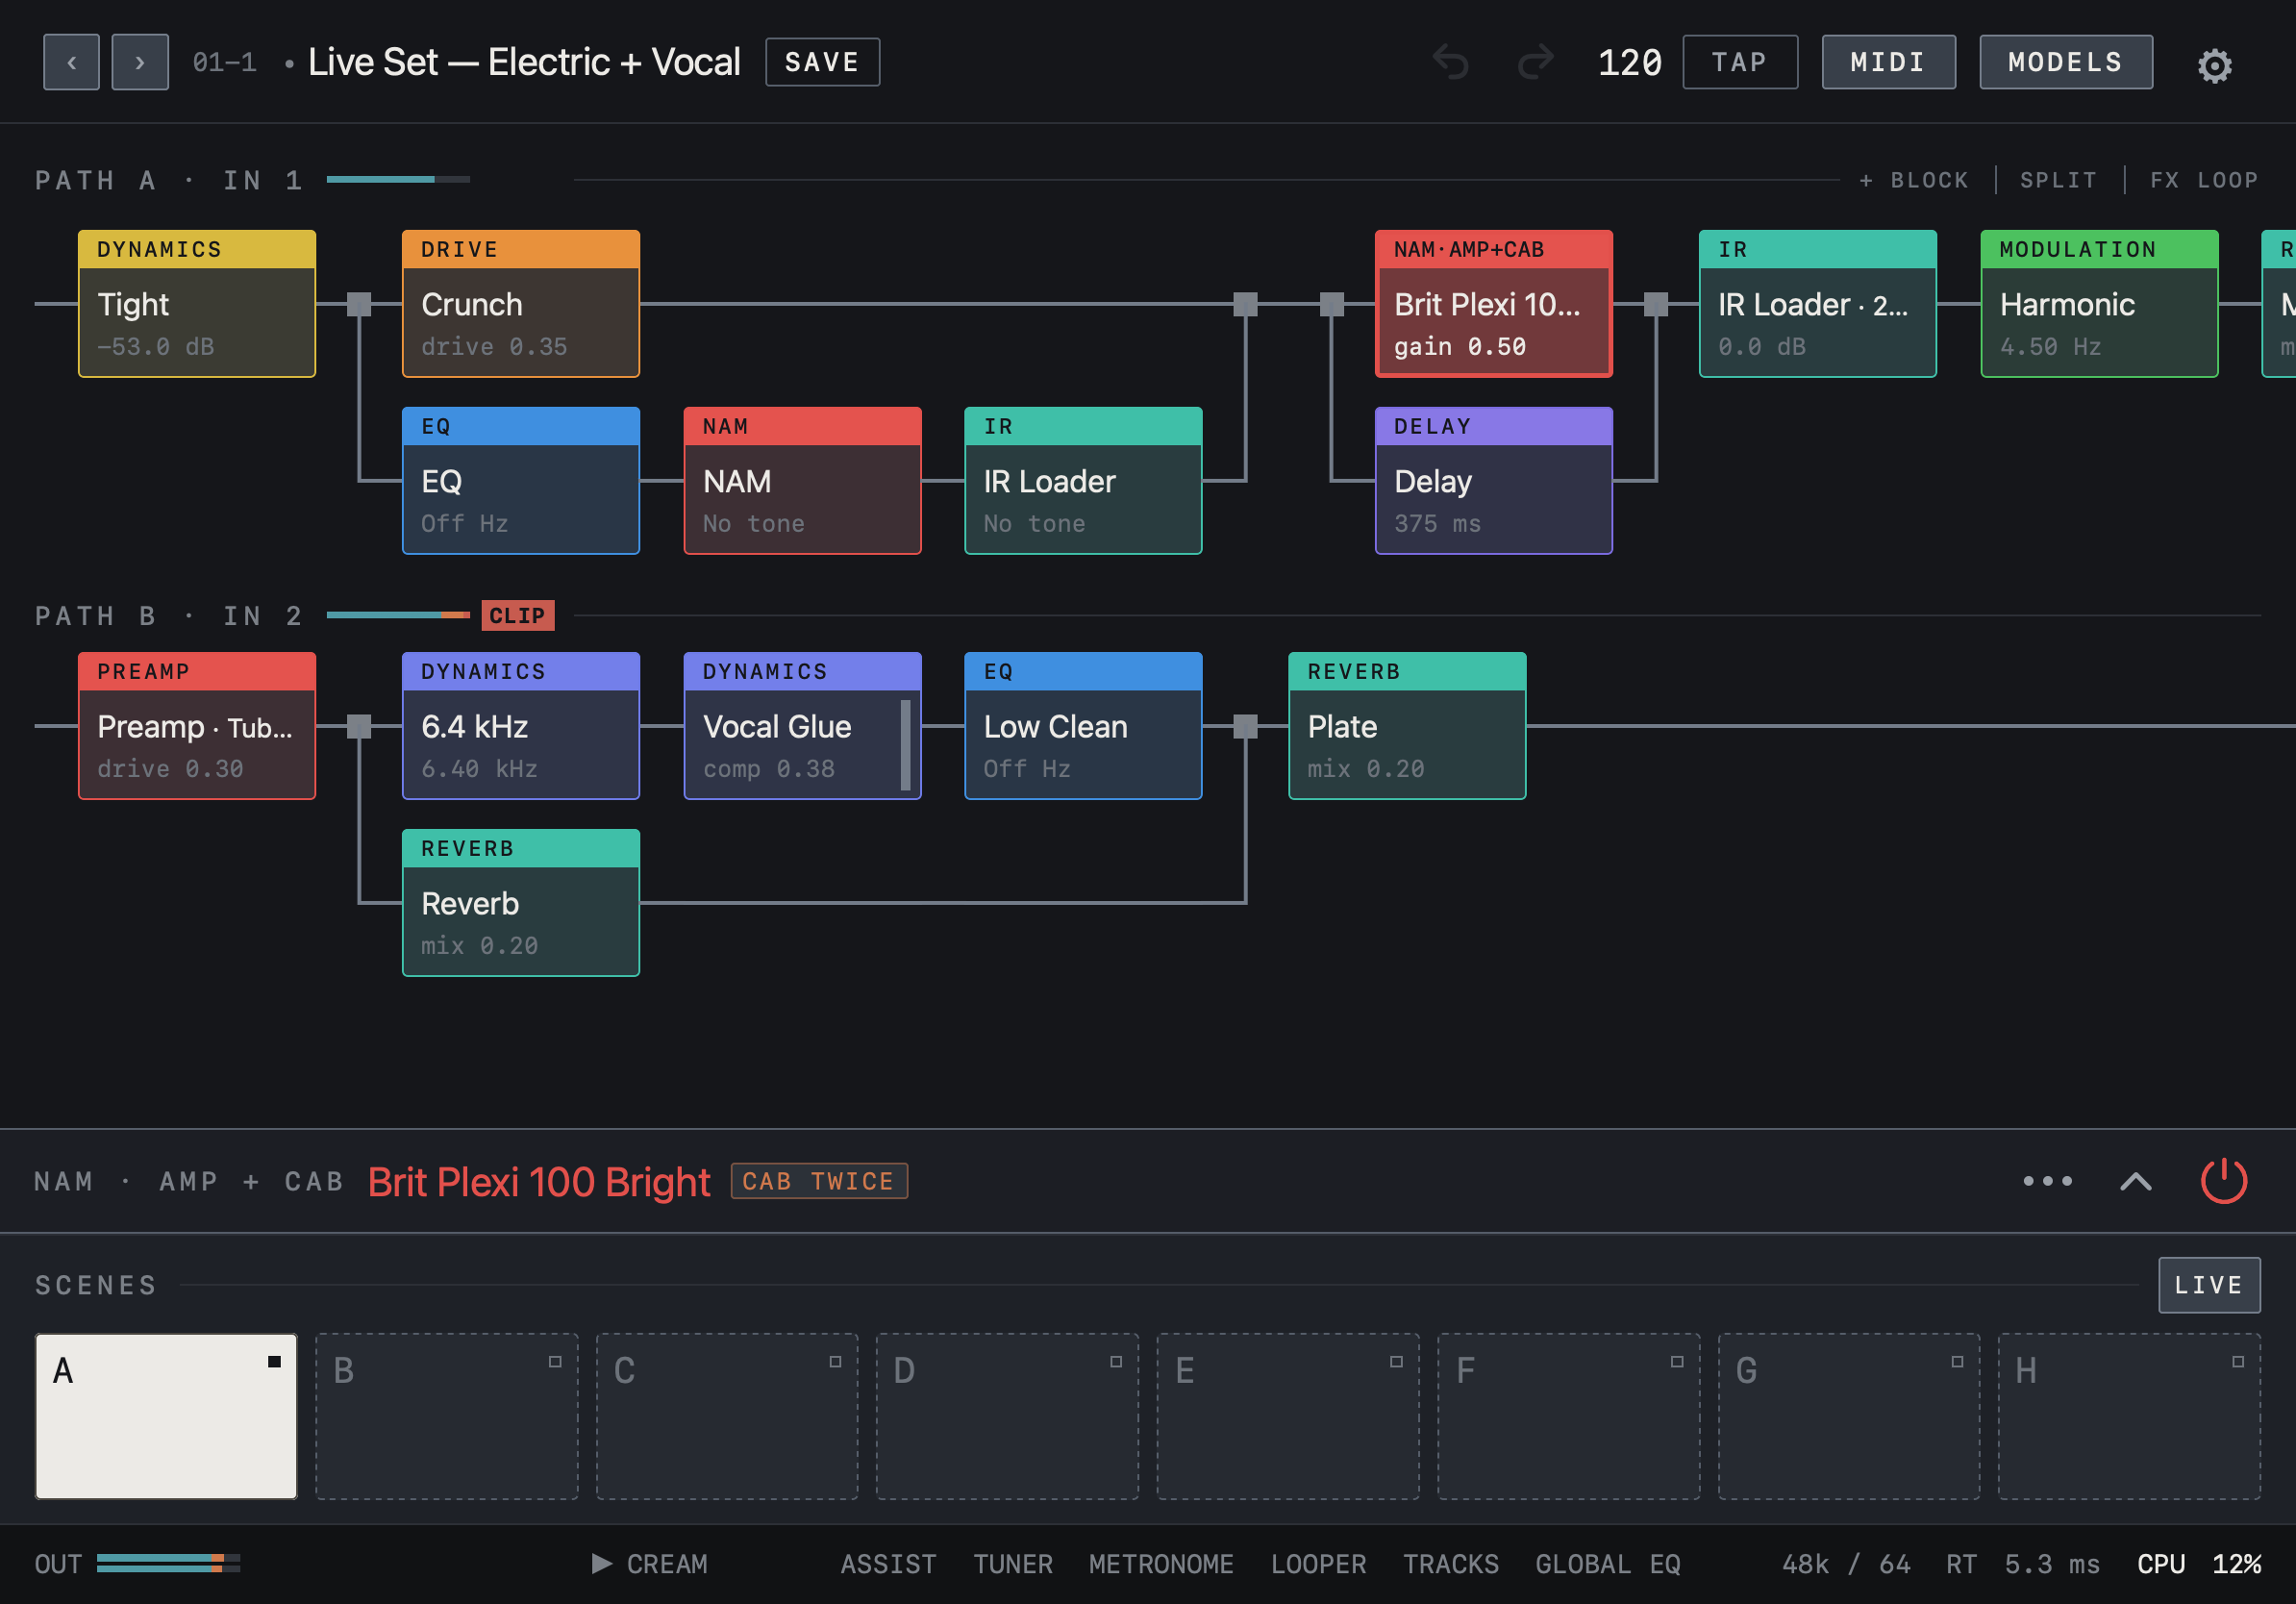
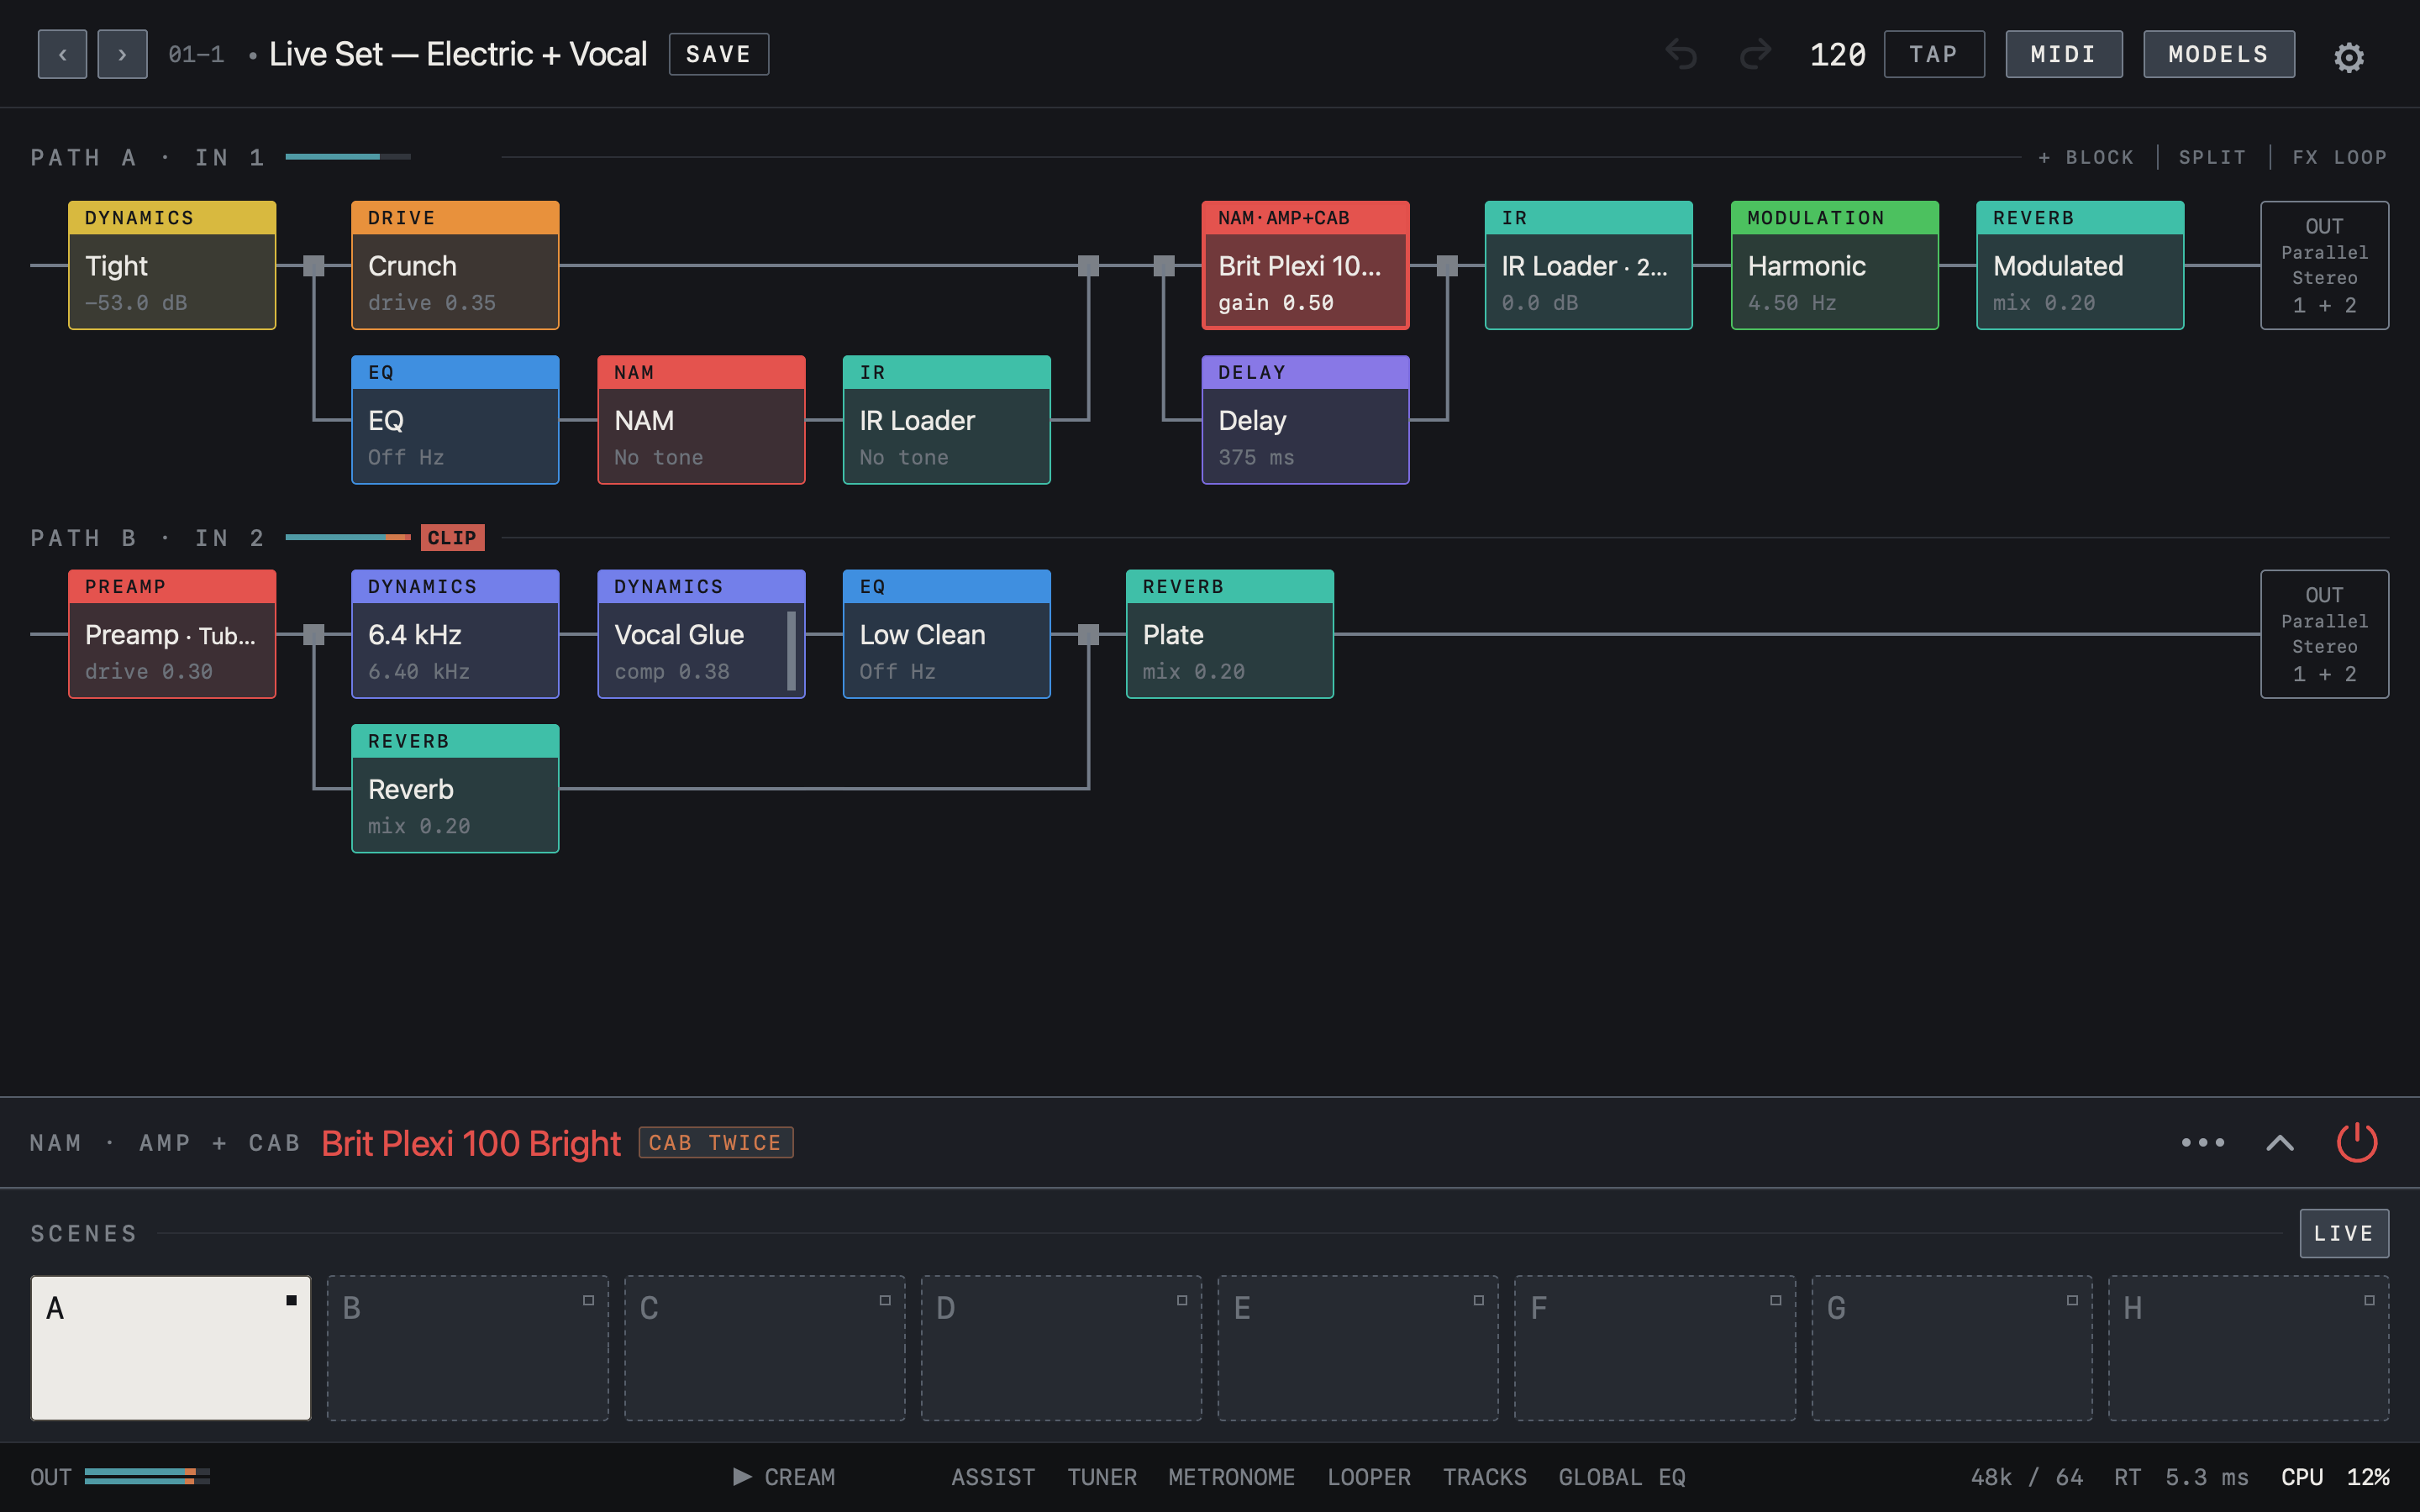
- Below the PATH A chain sits a separate chain for PATH B · IN 2. Each Path has its own blocks and parallel splits.
- PATH B in this example is a vocal chain running from Preamp to a Plate reverb.
- The parameter panel is folded here. If the open panel hides PATH B, fold it with the ⌄ at the right of the panel.
Find it on screen
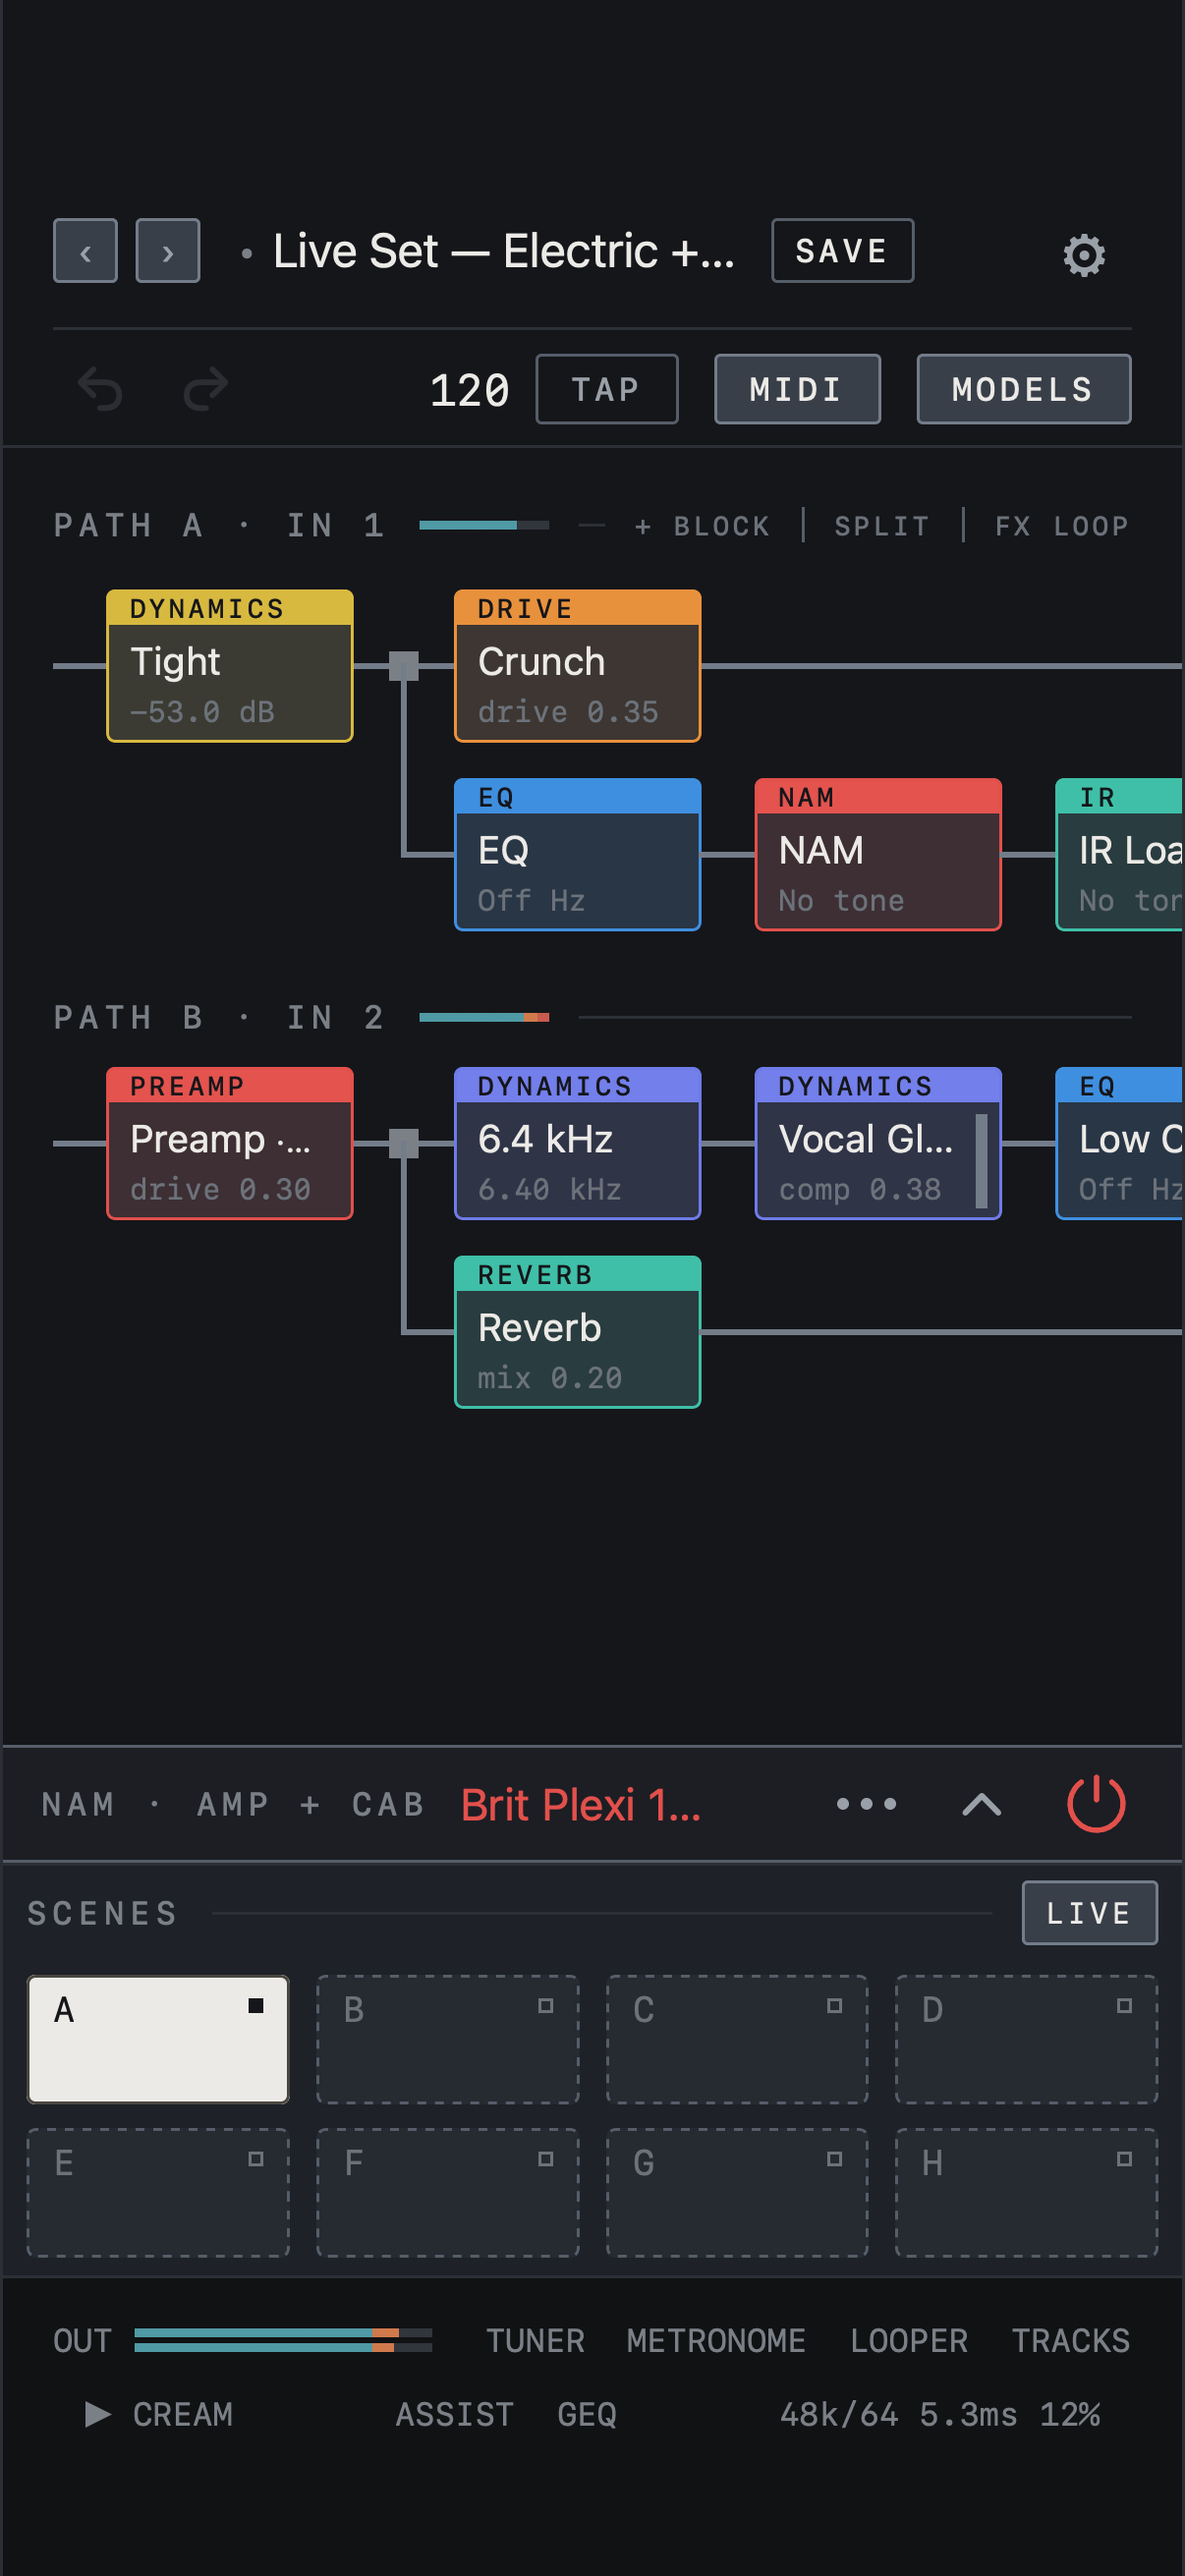
- Below the PATH A chain sits a separate chain for PATH B · IN 2. Each Path has its own blocks and parallel splits.
- PATH B in this example is a vocal chain running from Preamp to a Plate reverb.
- The parameter panel is folded here. If the open panel hides PATH B, fold it with the ⌄ at the right of the panel.
Find it on screen
- Below the PATH A chain sits a separate chain for PATH B · IN 2. Each Path has its own blocks and parallel splits.
- PATH B in this example is a vocal chain running from Preamp to a Plate reverb.
- The parameter panel is folded here. If the open panel hides PATH B, fold it with the ⌄ at the right of the panel.
Choose the output
Select OUT at the end of the chain to open the path’s output panel. Choose Mono, Stereo, Parallel Stereo, or Wet / Dry / Wet under OUTPUT MODE, then assign physical interface channels under OUTPUT. LEVEL, MUTE and SOLO apply to the whole path. The output mode and hardware assignments are stored on the device and carry over when you change presets. The looper, drums and click use OUT 1/2.
Note Check the interface’s mixer or manual to see which output pair feeds its headphone jack.
Find it on screen
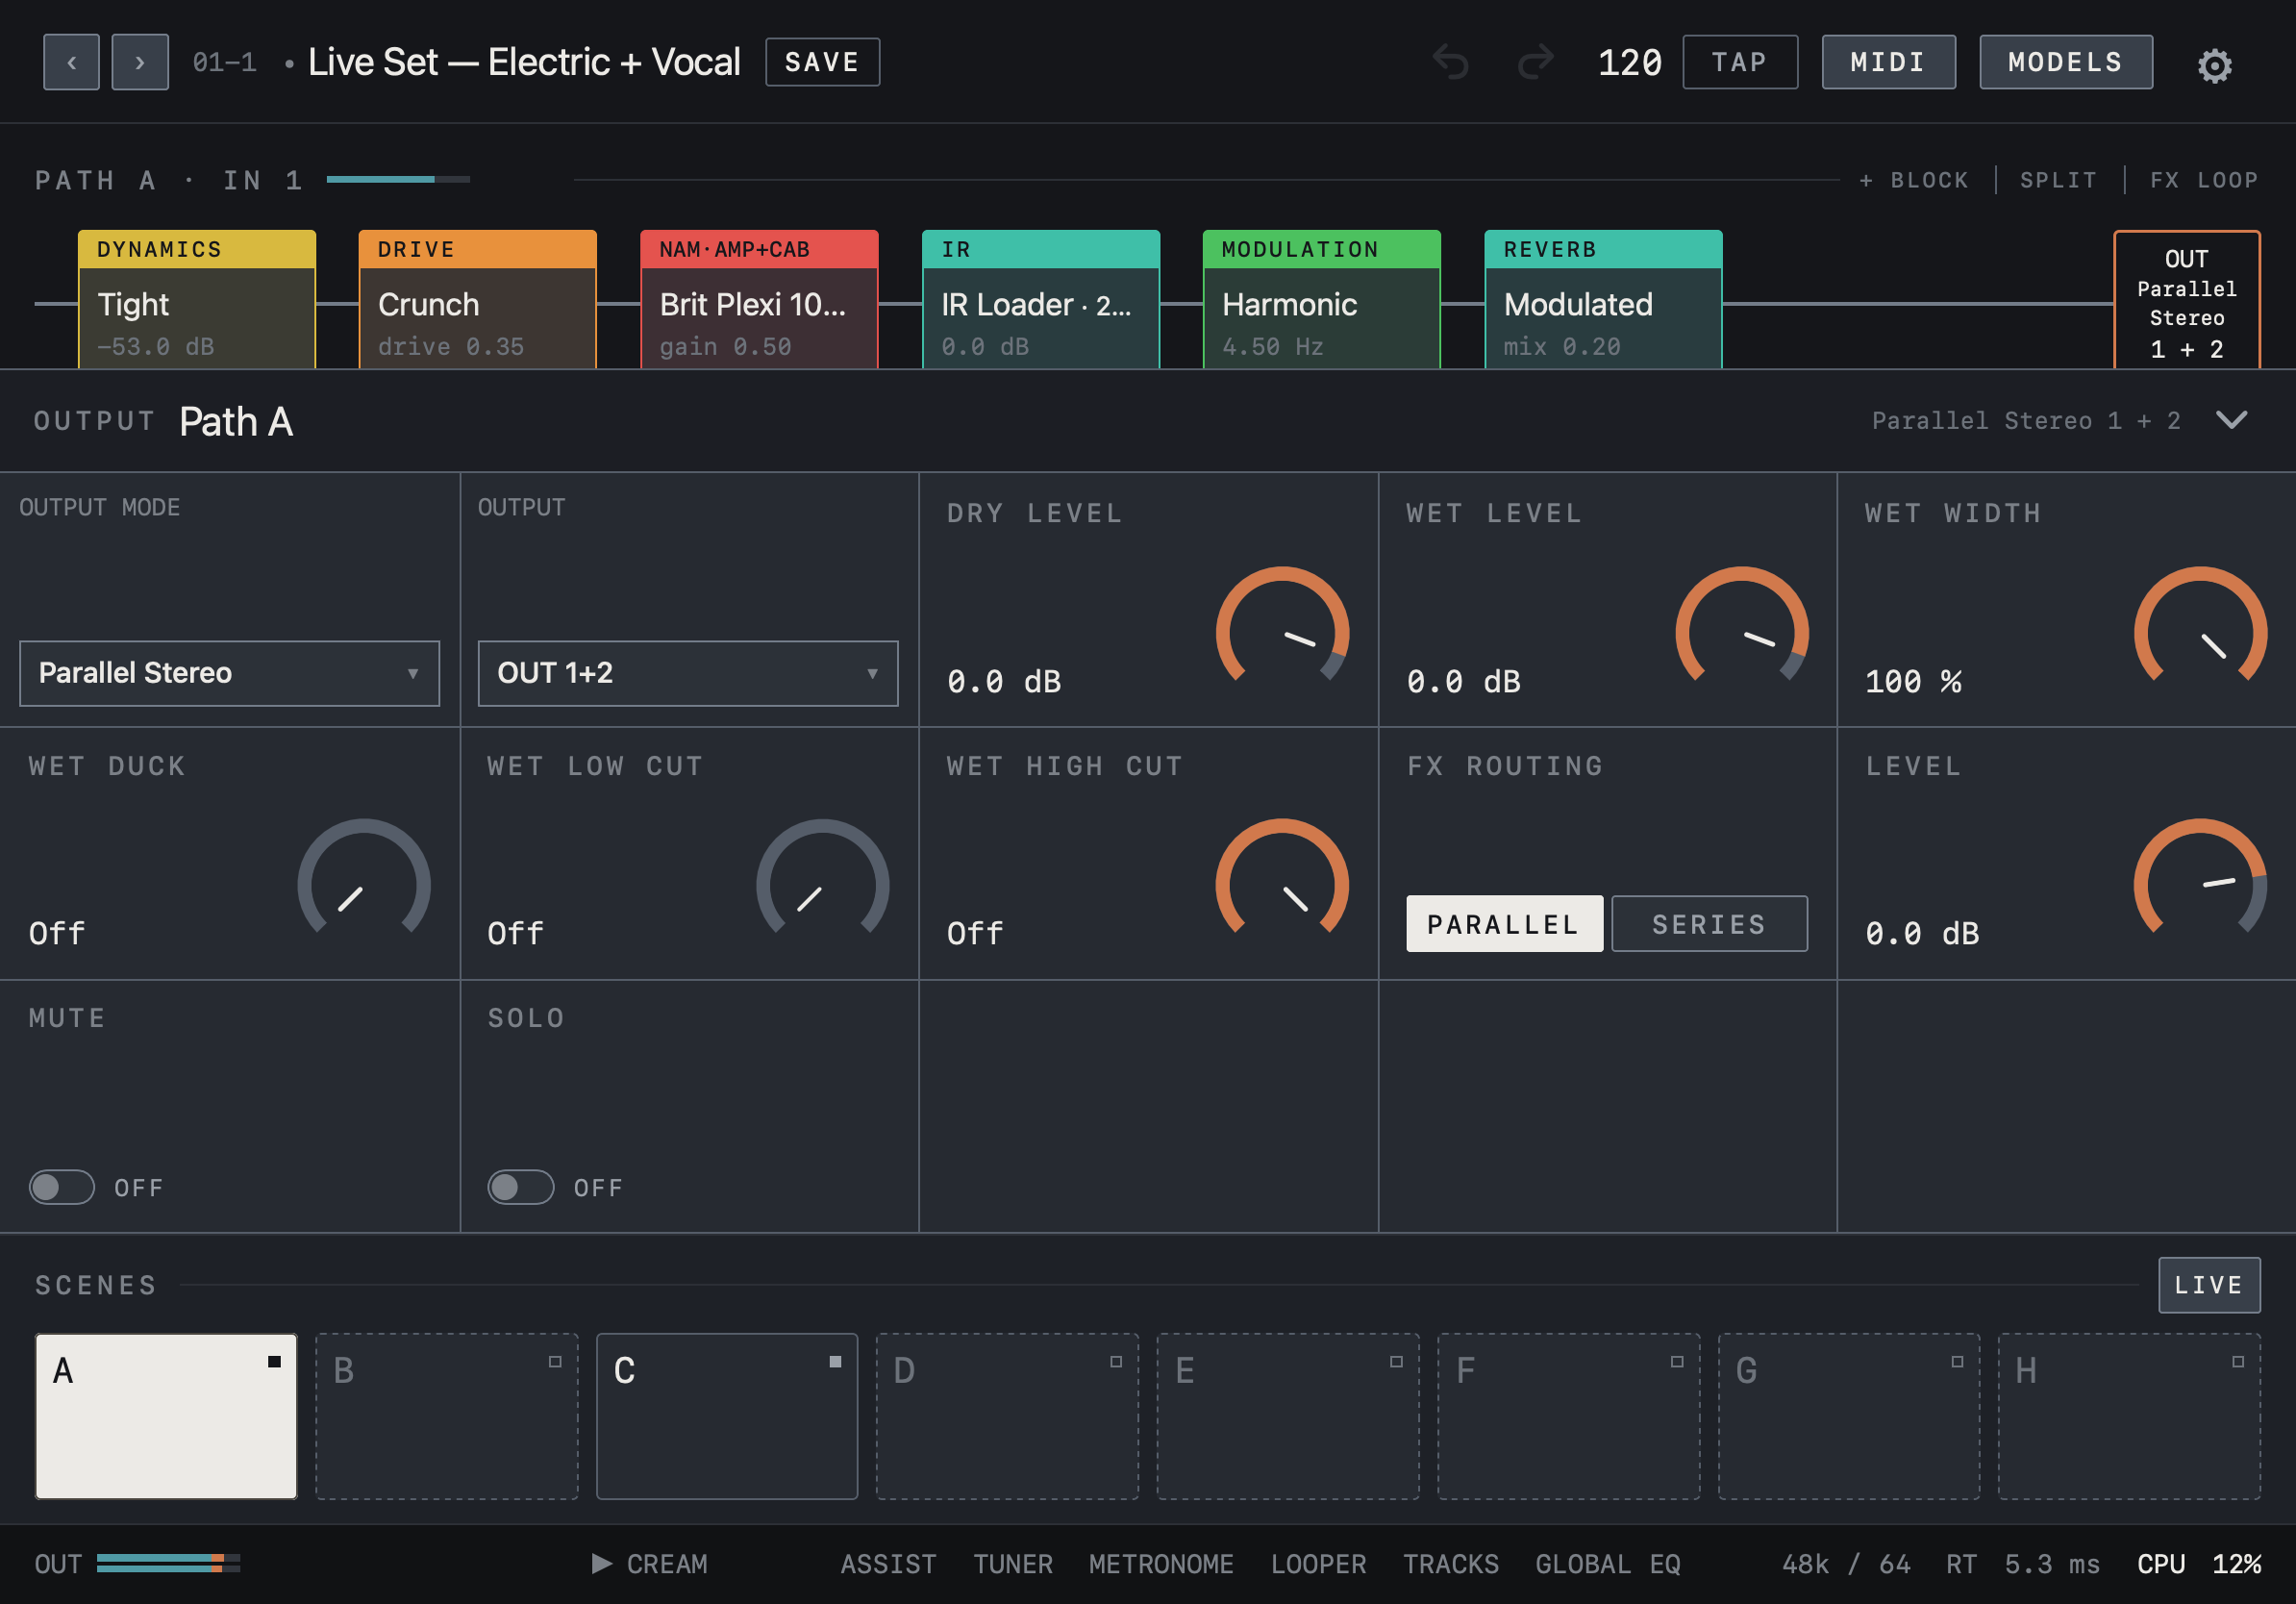
- Tap OUT at the end of the chain to open that Path’s OUTPUT panel.
- Choose the mode under OUTPUT MODE and the physical channels under OUTPUT. This example shows Parallel Stereo on OUT 1+2.
- LEVEL, MUTE and SOLO act on the whole Path; DRY LEVEL, WET LEVEL and WET WIDTH balance the dry signal and the time-based effects.
Find it on screen
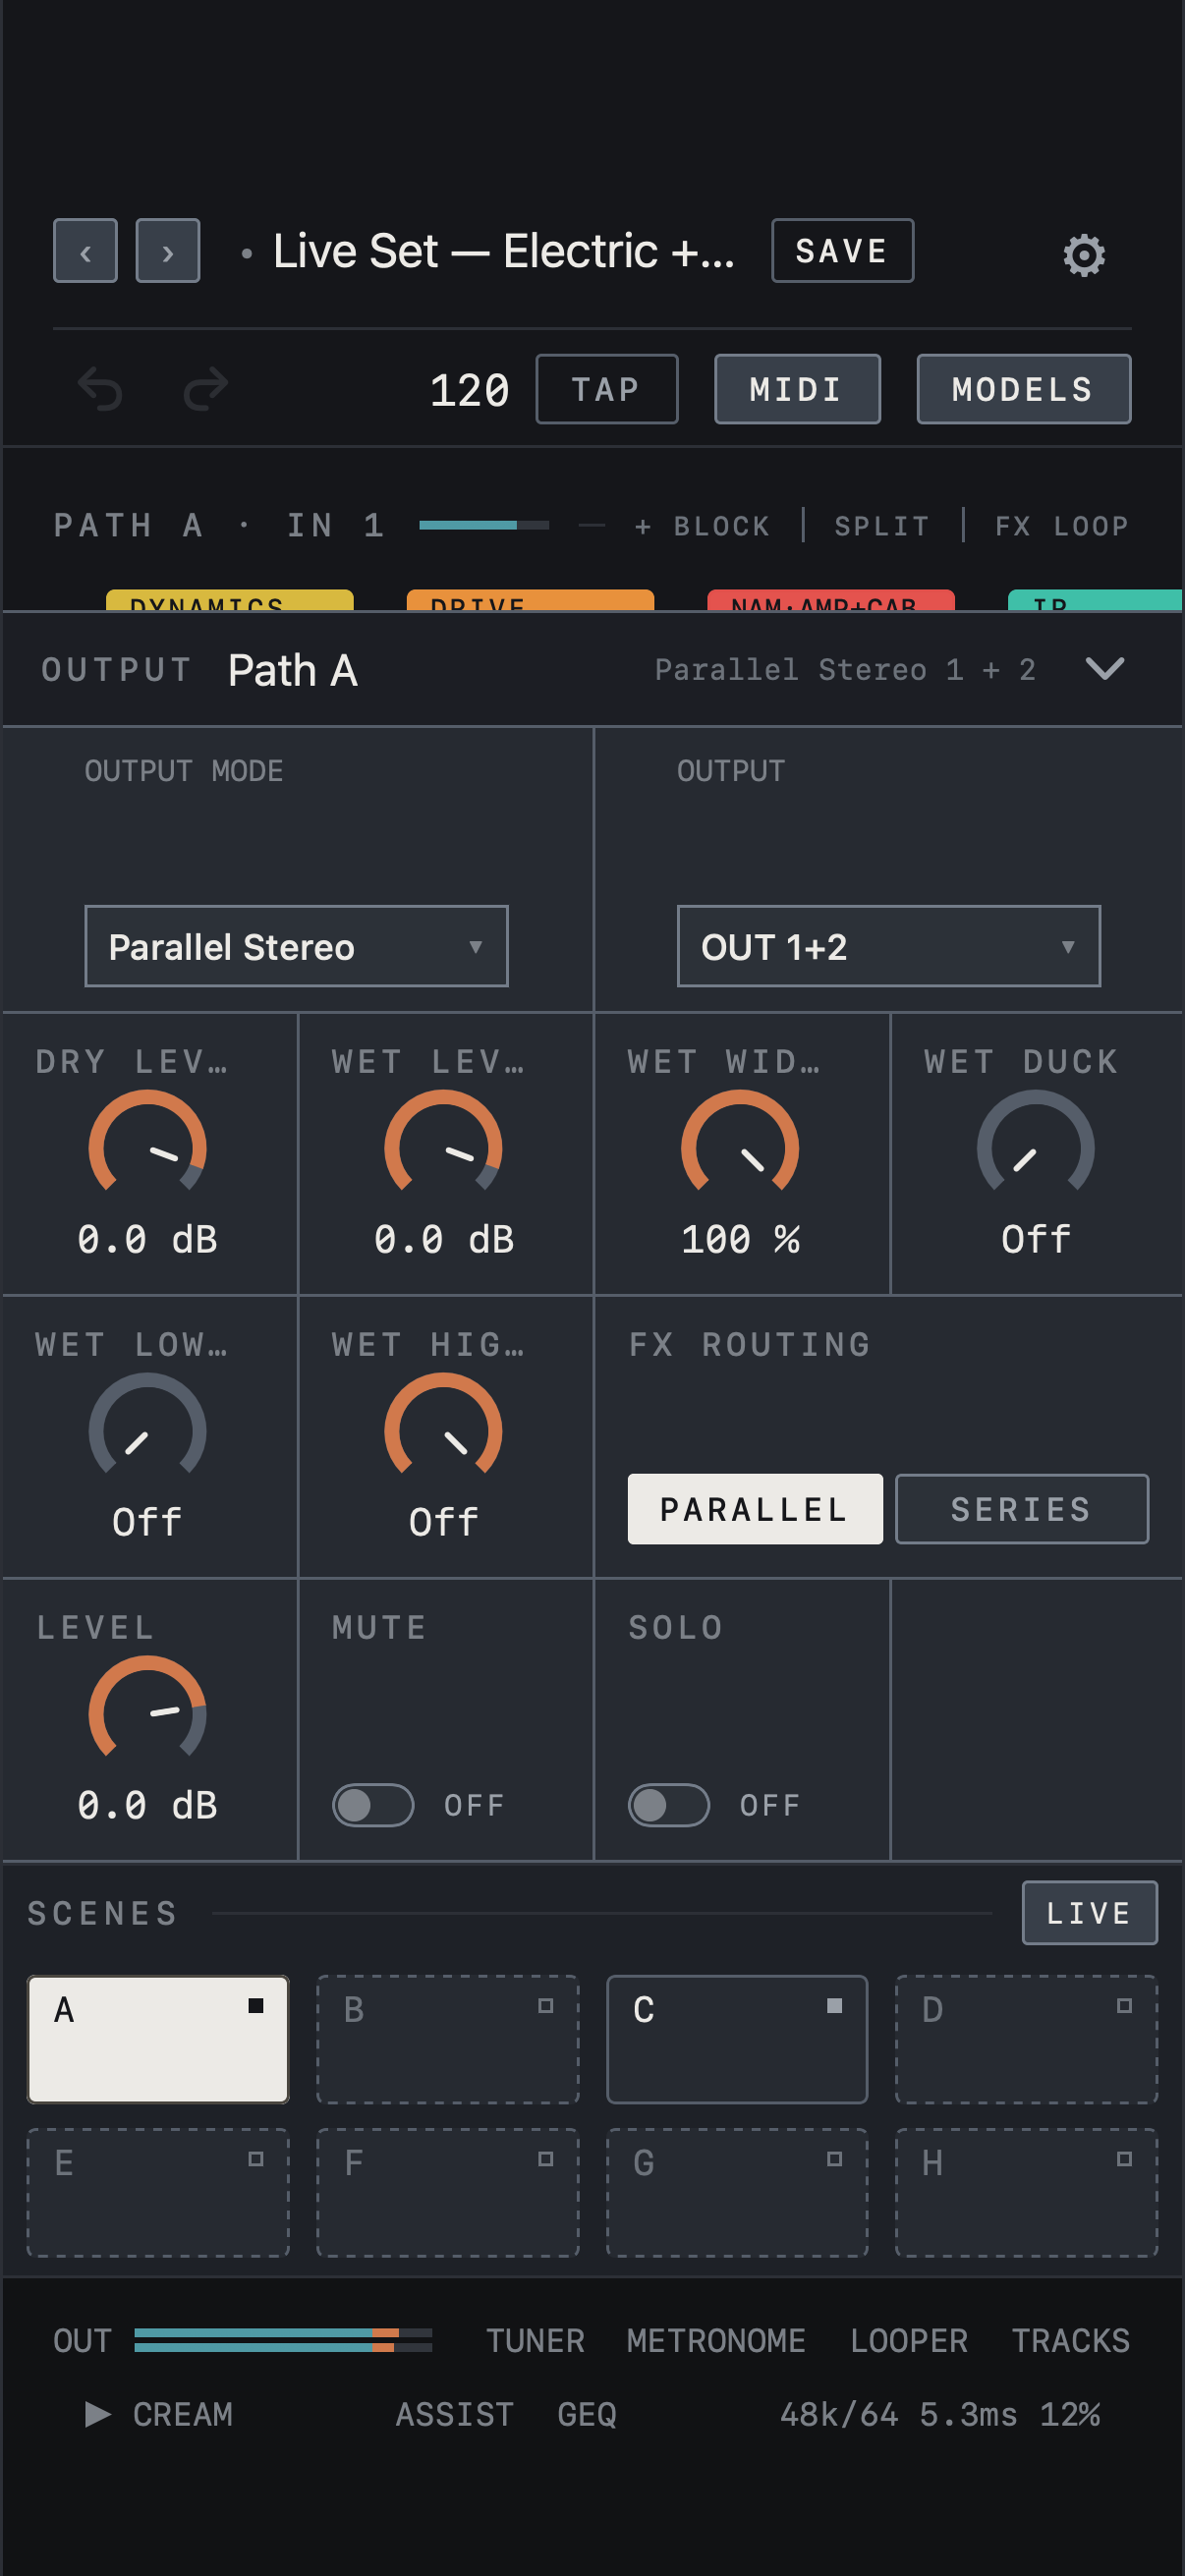
- Tap OUT at the end of the chain to open that Path’s OUTPUT panel.
- Choose the mode under OUTPUT MODE and the physical channels under OUTPUT. This example shows Parallel Stereo on OUT 1+2.
- LEVEL, MUTE and SOLO act on the whole Path; DRY LEVEL, WET LEVEL and WET WIDTH balance the dry signal and the time-based effects.
Find it on screen
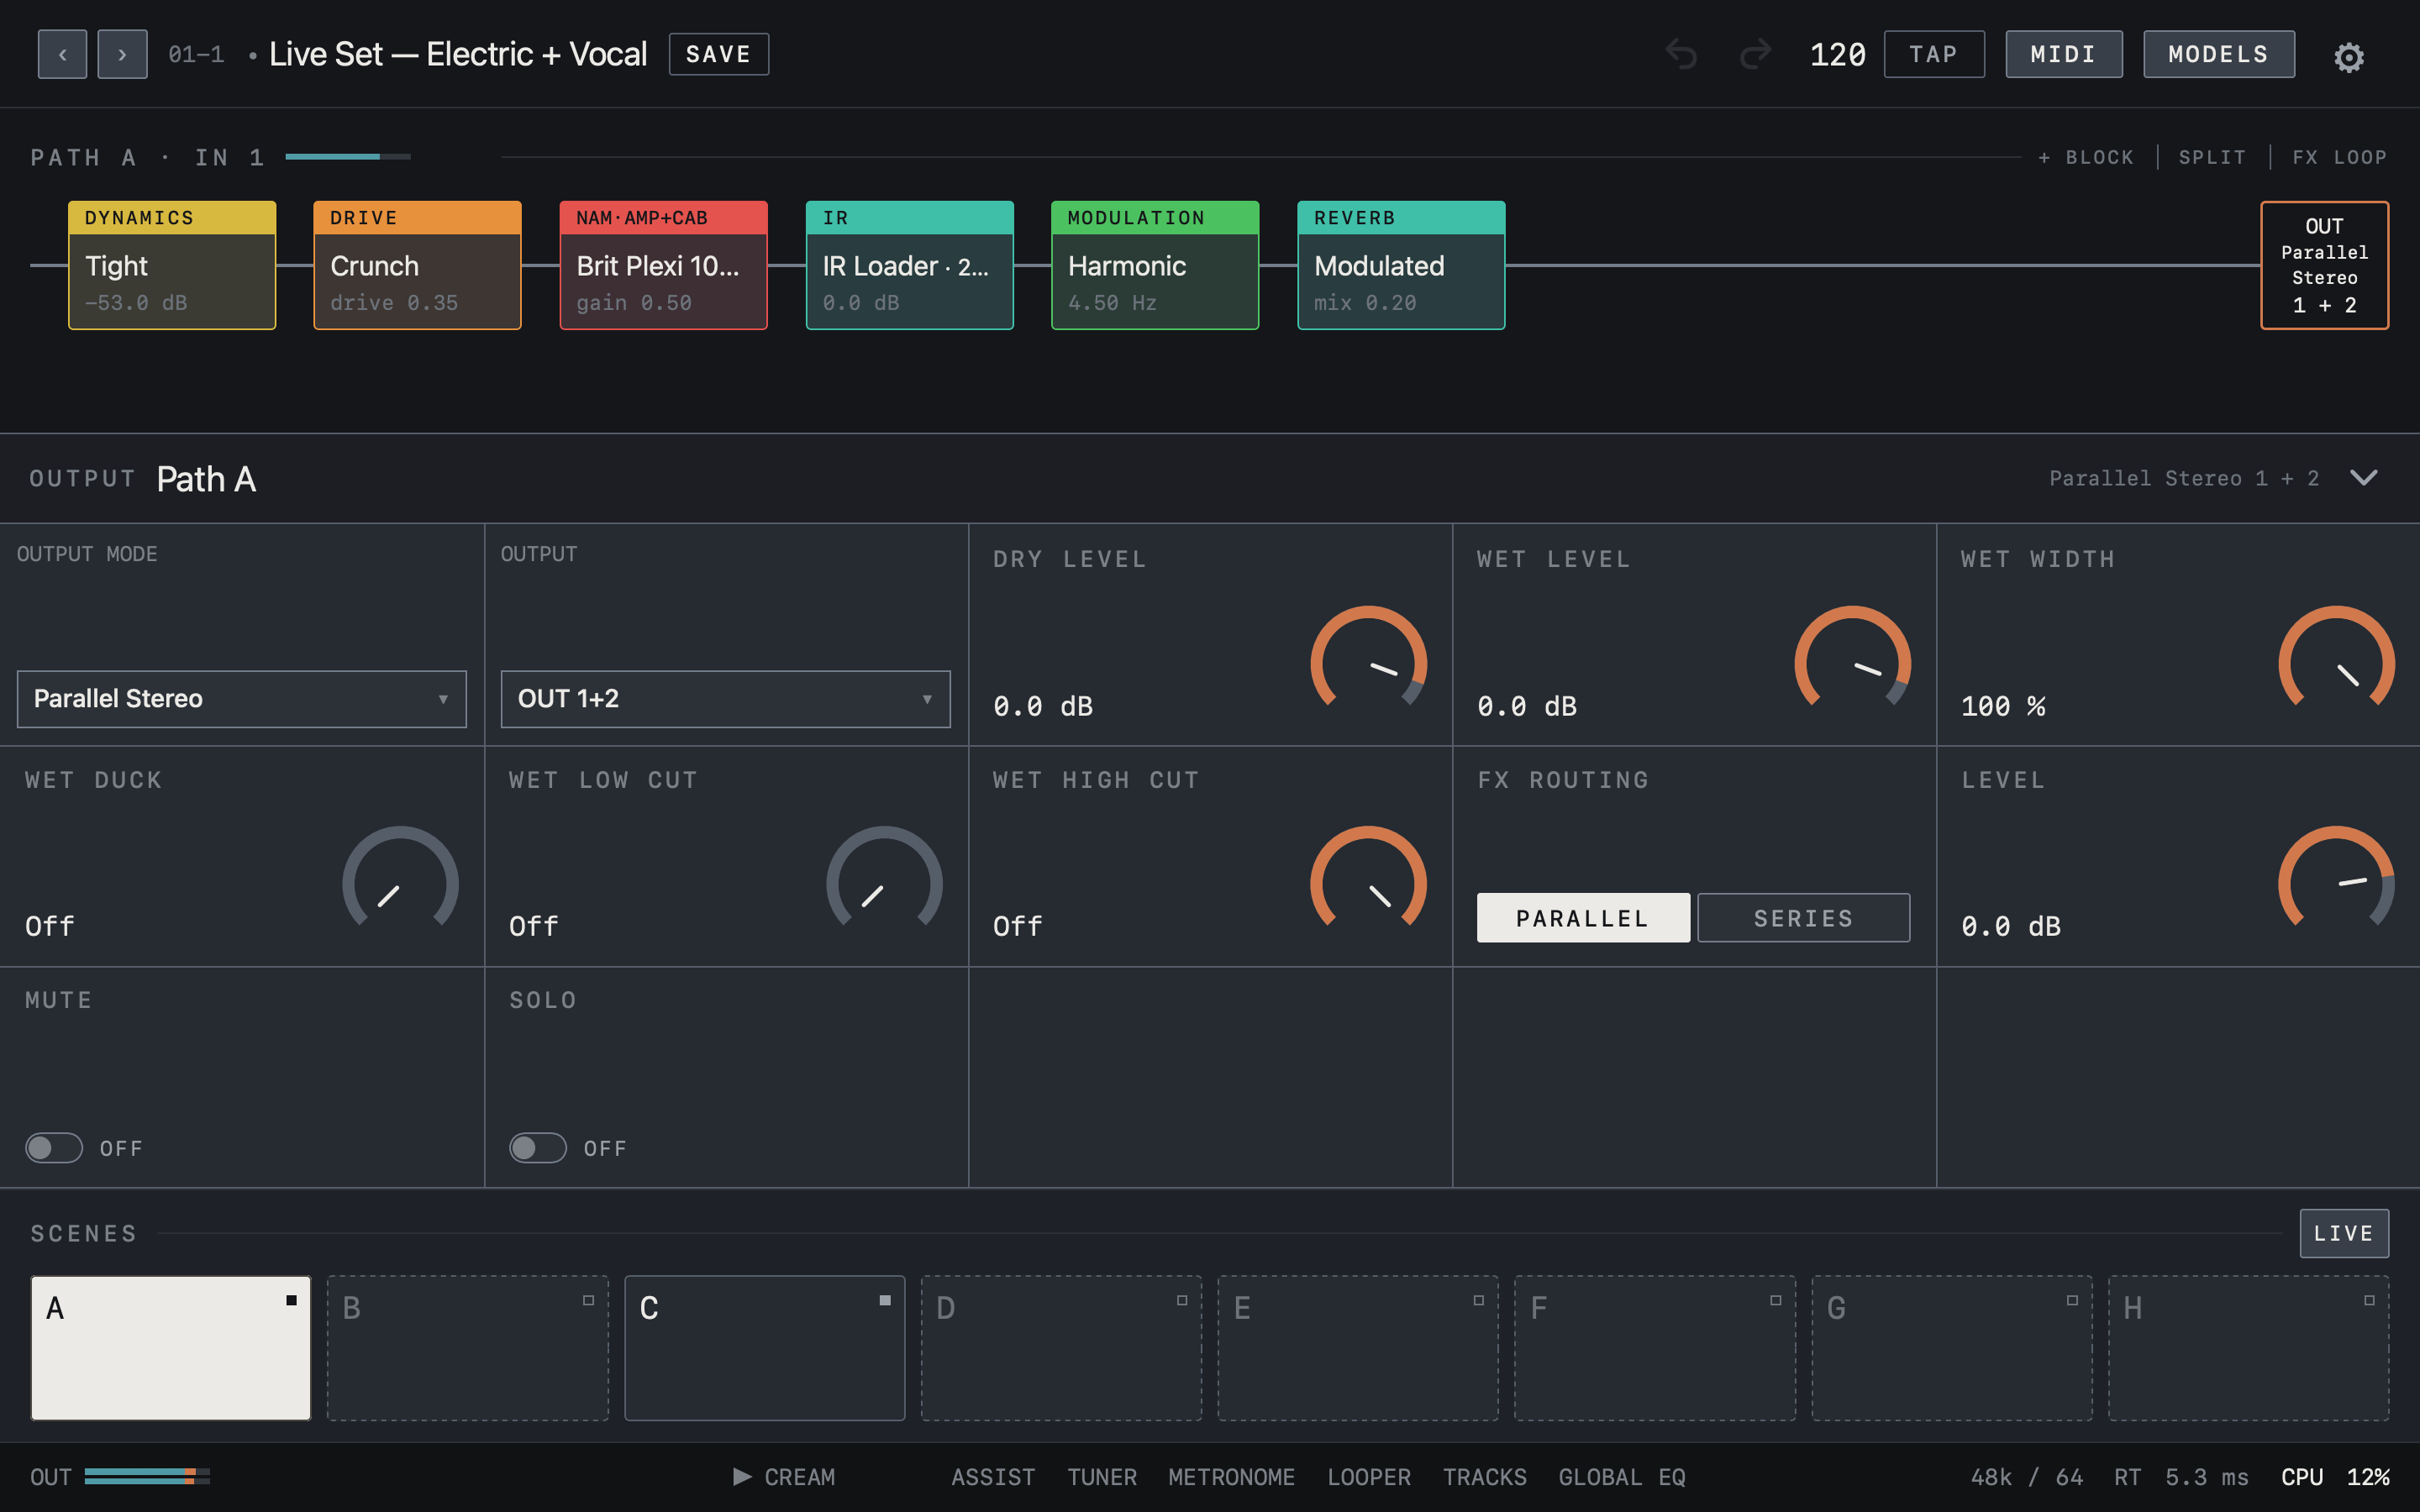
- Tap OUT at the end of the chain to open that Path’s OUTPUT panel.
- Choose the mode under OUTPUT MODE and the physical channels under OUTPUT. This example shows Parallel Stereo on OUT 1+2.
- LEVEL, MUTE and SOLO act on the whole Path; DRY LEVEL, WET LEVEL and WET WIDTH balance the dry signal and the time-based effects.